


(v12 03-29-22)
TO LOAD THIS PICO-8 CART, in immediate mode, type:
load #fillp_editor
VVHAT'S NEW ?
(03-29-22)
- Updated main code to paste properly even if from an outside source like internet or notepad.
- Updated demo code with helpful notes inside the code to explain exactly how it works. (SEE BELOW).
(03-28-22)
- Fixed CRASH when attempting to scroll empty field.
- Fixed overlapping sprite information.
(03-27-22)
- New method for manipulation of pattern blocks.
- Overhaul button state recognition and reaction code.
- Improved extra button view. No longer do 2-special buttons appear at one time.
- Added mirror-X and mirror-Y.
- Added 90-degree rotation.
(03-26-22)
- Added ability to scroll pattern in edit. thank you, @beanborg for the suggestion!
To use hold down the ❎ key and press an arrow in the direction you wish to scroll the pattern. Pattern will wrap around edges.
(03-21-22)
- Pattern can now be seen changing above you as you enter it.
- Added INVERT button in bottom-right-hand corner.
- Added 2-line information below to show exactly what code creates the visible pattern above.
- Adjusted code slightly for new visual margins and information.
? if you come across a bug or there is something you would like changed or added, please let me know!
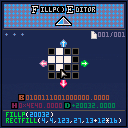
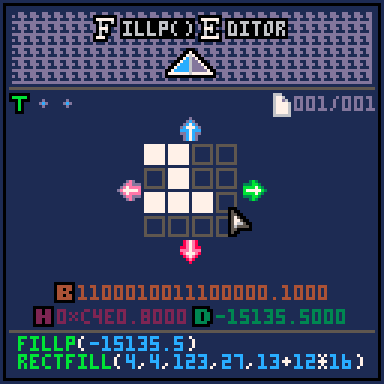
OVERVIEW:
This program will let you not only create single 4x4 patterns and see them as you enter them, but you can have a whole set, up to 256 if you like ! and even includes the unique 3-flags of TRANSPARENCY, SPRITE, and GLOBAL for each FILLP() pattern.
With new suggestion by beanborg you can now hold down the ❎ key and scroll with wrap ability. Just hold down the ❎ key and while it is held, press the arrow in the direction you want to scroll your pattern.
KEYS TO USE:
- Use arrow keys to navigate 4x4 frame. Cursor does not wrap but hits edges where additional commands can be seen.
- press 🅾️ to plot or unplot pixel in the 4x4 field.
- Hold ❎ and arrow keys to scroll the 4x4 field with wrap-around pixels. Release when complete.
- Move the cursor to the far left vertical center to highlight PREV which when 🅾️ is pressed will go to the previous pattern. You have 256-patterns available to work with and will wrap from 1 to 256 and vice-versa.
- Move the cursor to the far right vertical center to highlight NEXT which when 🅾️ is pressed will go to the next pattern. Same as above will wrap around.
- Move the cursor to the far left on the 1st vertical pixel and INV-X will appear. When 🅾️ is pressed will take the 4x4 pixels and invert them horizontally.
- Move the cursor to the far right on the 1st vertical pixel and INV-Y will appear. When 🅾️ is pressed will take the 4x4 pixels and invert them vertically.
- Move the cursor to the far right on the 4th vertical pixel and ROTATE will appear. When 🅾️ is pressed will take the 4x4 pixels and rotate them 90-degrees to the right.
- Move the cursor to the far left on the negative one vertical pixel and TRANSP will appear. When 🅾️ is pressed this will turn on/off the TRANSPARENT flag for this pattern. When this bit is active, the second color is not drawn.
- Move the cursor to the far right on the negative one vertical pixel and SPRITE will appear. When 🅾️ is pressed this will turn on/off the SPRITE flag for this pattern. When this bit is active, the fill pattern is applied to sprites (SPR, SSPR, MAP, TLINE).
- Move the cursor to the far left on the "5th" vertical pixel and GLOBAL will appear. When 🅾️ is pressed this will turn on/off the GLOBAL flag for this pattern. When this bit is active, the secondary palette mapping is also applied by all draw functions that respect fill patterns (CIRC, CIRCFILL, LINE).
- Move the cursor to the far right on the "5th" vertical pixel and INVERT will appear. When 🅾️ is pressed every 4x4 pixel in the field will turn to their opposite. On to off and off to on. Click again to revert back.
- Move the cursor to the center on the "5th" vertical pixel and EXPORT will appear. When 🅾️ is pressed your pattern or series of patterns (if you have more than one) will be exported. See ADDITIONAL below.
- Move the cursor to the center on the negative one vertical pixel and IMPORT will appear. When 🅾️ is pressed the clipboard is scanned for the exact code you earlier pasted to read in and convert back to where it can be edited in my FILLP EDITOR. See ADDITIONAL below.
Note the two programming lines below the 4x4 grid seen above. This shows what value FILLP() has for the pattern you are working on and the 3-numbers above, Binary, Hexadecimal, and Decimal also appear and change every time you add or remove a pixel. As you can see in RECTFILL() you can have a pattern appear as 2-colors by adding a new colored multiplied by 16. In this case it is color 13 (violet) combined with color 12 (aqua).
Be aware that all Pico-8 patterns are not OR but AND. They REMOVE pixels from a solid pattern, not the other way around. If you want to draw a pattern but have it OR, draw what you want first, then select the INVERT button.
If there is a need to do this backwards where the results in the grid appear the same but the actual data saved and the pattern appearing above is the opposite for transparent-flagged sprites, i can do so. I could add a menu item with the regular MENUITEM() to optionally reverse the storage for transparent patterns. Just ask.
ADDITIONAL:
This pattern editor has the ability of both importing and exporting patterns.
To EXPORT your pattern or more than one if you have created more than one, move the cursor until it is in the horizontal center and then move the cursor until it is in the "5th" vertical position. The word, "EXPORT" will appear. Press 🅾️ and you will be asked some questions.
The first is, EXPORT TO HEX OR DEC? Any time the screen turns black and you have a question, you can change your answer from ? by pressing any of the 4-arrow keys. ⬆️ or ➡️ will select the next choice. ⬇️ or ⬅️ will select the previous answer.
In this instance you have choices of ? HEX DEC and ABORT
HEX means when you EXPORT the numbers will be listed in hexadecimal notation. DEC means they will be decimal and if you click ON the top-left-hand corner pixel, the number will be negative. Select ABORT of course to cancel this.
The next is, BASE ZERO OR ONE? Once again use the arrow keys to navigate the choices. In this instance you have choices of ? ZERO ONE and once again ABORT
Choose ZERO if you want your array to be preceded by [0]= to force the first element to appear at array position zero, IE: patd={[0]=n1,n2,etc}
Choose ONE which is default where normal LUA arrays start at 1 (one). IE: patd={n1,n2,etc}
Make your choice again with the 🅾️ key.
If you are ONLINE a 3rd choice will appear. PRESS CTRL+C NOW! Well not really so much a question. Nonetheless from here press CTRL+C then select DID SO and 🅾️.
COPIED TO CLIPBOARD will appear. Select NICE and 🅾️.
CTRL+V WILL PASTE will appear. Select GOTCHA to confirm you understand and press 🅾️.
Then you will return back to the editor. Be aware the arrays are PATH[] for hexadecimal and PATD for decimal.
To use this in any Pico-8 code, merely press CTRL+V to paste as was instructed.
For instance, let's say you made:
and

EXPORT those two patterns.
Now start a new Pico-8 session by either ending FILLP EDITOR or starting a new task, and type out the following in source code:
cls(1)
((press CTRL+V HERE))
fillp(path[0])
rectfill(0,0,31,31)
print("",0,32)
|
The print() command will move the cursor out of the way of the rectangle.
Your code should now appear as:
cls(1)
path={[0]=0xc4e0.8,0xae20}
fillp(path[0])
rectfill(0,0,31,31)
print("",0,32)
|
Notice that the 1st pattern has a fractional number. That is because if you look at the two patterns above, the 1st one has the "T" flag lit for TRANSPARENT as we set it.
RUN or press CTRL+R to run this program and be aware of the output:
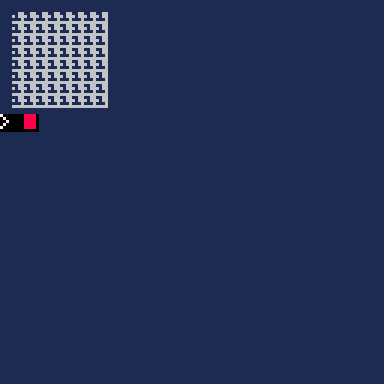
You can see that the dark blue peeks through because of the transparency flag set for this pattern. While you cannot change the background color in this pattern, you CAN change the foreground by changing the last line thus:
rectfill(0,0,31,31,8)
And there you have RED with transparent pattern.
To see the next pattern, if you change the next-to-last line to read, 1 instead of 0 (zero) you will have:
cls(1)
path={[0]=0xc4e0.8,0xae20}
fillp(path[1])
rectfill(0,0,31,31,8)
print("",0,32)
|
You will have the 2nd pattern with the exception that the background color is BLACK.
To force a background color for the output, merely add a new number multiplied by 16.
So you would get the following:
rectfill(0,0,31,31) ...

|
[16x16] |
rectfill(0,0,31,31,7+2*16) ...

|
[16x16] |
rectfill(0,0,31,31,2+7*16) ...

|
[16x16] |
rectfill(0,0,31,31,14) ...

|
[16x16] |
rectfill(0,0,31,31,4+8*16) ...

|
[16x16] |
To load existing pattern data, copy the entire single programming line to the clipboard, it can be from any source including Pico-8, Online web browser, or even Notepad. Run this program again. This time move the pointer all the way up to select IMPORT. Follow the instructions there including to press CTRL+V to authorize paste text. Provided it is exactly as you pasted it earlier, it will be loaded back in the editor where you can make further changes.
Here is a sample program that includes the data clipped from the FILLP()Editor and makes use of transparent patterns. Press 🅾️ to do a fancy screen wipe with patterns and change the screen.
(v4 03-29-22)


TO LOAD THIS PICO-8 CART, in immediate mode, type:
load #fillp_demo
VVHAT'S NEW ?
(03-29-22)
- Added helpful notes for all of code.
- Slowed down the animation effect slightly so it can be seen better.
Here is the pattern table used in the demo if you'd like to examine it in the editor:
path={0x7fff.8,0x37ff.8,0x137f.8,0x137.8,0x13.8,0x1.8,0x.8,0x8000.8,0xc800.8,0xec80.8,0xfec8.8,0xffec.8,0xfffe.8,0xffff.8}
|
To do so, left mouse button triple click to highlight it. Press CTRL+C. Then run my editor. Select IMPORT and examine all unique patterns.
Hope This Helps ! If you have any questions or suggestions, feel free to enter them below. :)


This is great and will be quite useful in my future projects. Thanks!
Thank you, @TheRoboZ ! Glad you find it helpful. I'm currently working on another Pico-8 utility, I will definitely post it too once complete.

This is great! One thing I would love to see is the ability to shift the pattern left/right or up/down. Sometimes with tweetcarts I want to make a pattern but I'm not sure what x or y offset it needs, so this would make it really easy!
Thank you, @beanborg.
Shift pattern ? Let me see, I think that can be done.
I'm not using the ❎ key at all. so hold that key and arrow key to scroll.
Alright, I did - a bit more than just that. Should be quite complete. Please check the top, and thanks again ! I'm glad this is helpful for others.

Hi @dw817.
New to this, and wondered why you use a signed decimal (-32k to 32k) rather than just unsigned (0 to 64k) and letting Lua deal with the overflow? It seems to work and saves a character?...
Hi @aced. Thanks for your interest !
I think you mean why is the unsigned the number not >32767 ?
Pico-8 is not capable of this ... yet.
Try this code:
a=32767 b=32768 c=-32768 d=-32769 cls() ?a ?b ?c ?d |
The results will be:
32767 (correct) -32768 (wrong, should be 32768) -32768 (correct) 32767 (wrong, should be -32769) |
Since you cannot have a number >32767 such as 65535, I have to wrap-around to access the full 16-bit number.
Hmm... Please try:
cls() a=-21073 b=44463 fillp(a) circfill(32,32,32) fillp(b) circfill(64,64,32) |
This works for me, at least using www.pico-8-edu.com ...?
But as I said, this is my first time using Lua and p8- so there may be very good reasons to not do this, like the behaviour is 'undefined', etc.
Update~ -21073.0 is not the same pattern as -21073.5 (needs to be -21072.5); but 44463.0 give the same pattern as 44463.5 (as expected). Guessing this is down to how the fillp() function parses (/sanitises) the input value?... Perhaps this is obvious, but naively hoped it would work like 0x or 0b (unsigned) where we can simply set the decimal bits and not worry about the value... Sending a junk value (string) will default to 0x0000.

pico-8 numbers are fixed-point, so generic lua documentation doesn’t apply to us. read the official docs: https://www.lexaloffle.com/dl/docs/pico-8_manual.html#Types_and_assignment
Thanks @merwok. So although the overflow handling works as might be expected, it's essential undefined/ undocumented behaviour...? I'm just trying to understand what's the typical style for the p8 community. I've obviously seen the impressive wrangling for TweetCarts, and assumed the community is quite focussed on character count...? Otherwise, personally, I think the hexadecimal representation is a good balance of clarity and brevity.
[Please log in to post a comment]