Log In  
Follow
tonechild
~~~~~~~~~~~~~~~~~~~~~~~~~~~~~~~~~~~~~~~~~~~~~~~~~~~~~~~~~~~~
# name:        Matt McFarland
# occupation:  Software Engineer
# hobbies:     Coding, Games, Writing, Composing
# interests:   Scifi, Astronomy, History, Math, Etymology
~~~~~~~~~~~~~~~~~~~~~~~~~~~~~~~~~~~~~~~~~~~~~~~~~~~~~~~~~~~~
[ :: Read More :: ]

Dungeon Generation API

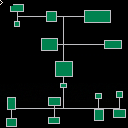
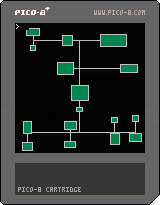
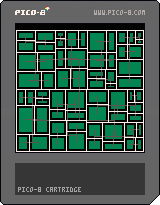
This is a highly commented, thorough dungeon generation API that uses BSP (Binary Space Partitioning)
The generation in the demo is slower than needed, as it tries very hard to create interesting dungeons. Because it is generic, it can be used to create dungeons made of pixels, tiles using pio8 map, or something else.

DEMO

Cart #39887 | 2017-04-24 | Code ▽ | Embed ▽ | No License
2

Usage:

genesis(width,height,max_depth,pathfn,renderfn,min_size) -> rooms, tree

Generates a dungeon using the BSP algorithm.
The width and height are arbitrary units that can be used for pixels, the pico8 map, or something of your own creation.

    local rooms, tree = genesis(
        map_width,
        map_height,
        depth,
        on_path_render,
        on_room_render
    )

max_depth (int)

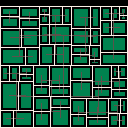
How deep the BSP tree gets. The greater the number, the more and smaller rooms are generated. For large maps, a higher number is useful, smaller maps, a lower number works better. The program will begin to decrease depth automatically if the process is taking too long. (decreases every second)

pathfn (function)

it is called with (x0,y0,x1,y1) where the coordinates make a line from two points, the line is always vertical, and horizontal. it always goes from center of a container to another center of another container. It is guaranteed to go from left to right, or top to bottom.

    function on_path_render (x0,y0,x1,y1)
        line(x0,y0,x1,y1,6)
    end

renderfn (function)

it is called with (x0,y0,x1,y1) where the coordinates make a rectangle called on your own by iterating over rooms and calling room.render() on each used to render tiles to the map, or to pixels.

    function on_room_render (x0,y0,x1,y1)
        rectfill(x0,y0,x1,y1,3)
        rect(x0,y0,x1,y1,6)
    end

min_size (int) (default: 8)

minimum room size before the room is not added to the rooms array, default is 8.
The program will decrease the minimum size automatically if it is taking too long to process, which is usually only the case when the minimum size is too high.

returns

A tuple of rooms and the tree. rooms contains data about each room in the map, and the tree contains traversable tree of containing cells primarily used for calling rendering functions.

Rendering

Assuming you have created something like the on_path_render and on_room_render functions above, you then iterate over the rooms and traverse the tree to render the map. In the demo, we use these functions:

    function render_rooms()
        foreach(rooms, function(room)
            room:render()
        end)
    end

    function render_paths(node)
        if (nil == node.lchild or nil == node.rchild) return
        node.lchild.leaf:render_path(node.rchild.leaf)
        render_paths(node.lchild)
        render_paths(node.rchild)
    end

Full Example

function _init()
    -- since we are rendering to pixels,
    -- we use the screen resolution
    local map_width=127
    local map_height=127
    -- define how deep our binary trie goes
    -- the higher, the smaller and more rooms you get
    -- for smaller maps, you should use a smaller number.
    local depth=6
    -- declare how the paths are rendered
    function on_path_render (x0,y0,x1,y1)
        line(x0,y0,x1,y1,6)
    end
    -- declare how the rooms are rendered
    function on_room_render (x0,y0,x1,y1)
        rectfill(x0,y0,x1,y1,3)
        rect(x0,y0,x1,y1,6)
    end
    -- get our room and tree tables from
    -- the generator
    local rooms, tree = genesis(
        map_width,
        map_height,
        depth,
        on_path_render,
        on_room_render
    )
    -- now we have our rooms and tree (technically trie)
    -- but they arent going to render themselves.
    -- to do this, we need to iterate over the rooms
    -- and the paths by themselves.

    -- create a function that will render all of the rooms
    -- by calling the render function on each of the rooms,
    -- the rooms themselves will then call the on_room_render
    function render_rooms()
        foreach(rooms, function(room)
            room:render()
        end)
    end
    -- create a function that will recursively walk down the tree
    -- and render paths between each container cell and
    -- rooms. which creates our hallways. it will end when
    -- it reaches the "bottom" of the tree, where a node does not
    -- have children.
    function render_paths(node)
        if (nil == node.lchild or nil == node.rchild) return
        node.lchild.leaf:render_path(node.rchild.leaf)
        render_paths(node.lchild)
        render_paths(node.rchild)
    end
    -- with our functions defined, we can now render the dungeon.
    cls()
    render_paths(tree)
    render_rooms()
end

Github

https://github.com/MattMcFarland/dungener

Installation

You can install this into your cartridge by copy and pasting all of the code from index.lua within the Github Repo.

P#39884 2017-04-23 21:20 ( Edited 2017-04-24 01:58)

[ :: Read More :: ]

Use Arrow Keys to change dungeon size
Press Z to make new dungeon


This is a dungeon created by using binary space partitioning (as described on roguebasin here: http://www.roguebasin.com/index.php?title=Basic_BSP_Dungeon_generation)

MIT Licensed

P#39808 2017-04-21 17:06 ( Edited 2017-11-30 04:43)

[ :: Read More :: ]

Overview

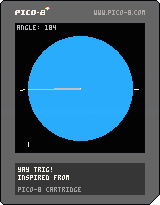
So the other day I delved deep into trig to pull out the bare minimum of what makes things move in circles.
The problem I've had in the past is that I often looked at games or demos that incorporated a lot more things, so I often would make incorrect assumptions about how to implement these types of things. My hope with this tutorial is to just show you the absolute bare minimum of what you need to get a sprite moving in a counter-clockwise circle, and explain everything line by line as best I can.

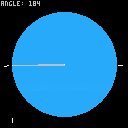
Here is what we are making:

To make something move in a circle, we have to use trigonometry. This tutorial is going to explain the trig functions we'll be using so that you can hopefully use them on your own without copy and pasting.

Prerequisites

To get the most out of this tutorial, you just need pico8 installed.

The gist

A sprite moving in a counterclockwise circle

radius = 30
originx = 64
originy = 64
angle = 0

while(true) do
 angle += 5
 if (angle > 360) angle = 0
 cls()
 x=originx + radius * cos(angle/360)
 y=originy + radius * sin(angle/360)
 spr(0, x, y)
 flip()
end

Rendering with pico8

NOTE: Skip this section if you want to get right to the trig! Just go to "Show me the trig!"

The thing I love about pico8 is that it doesn't get in your way! I can throw up an app that says draws a dot in the center of the screen its easy

Should you run the following script, you will see a dot in the middle of the screen

while(true) do
 cls()
 pset(64, 64)
 flip()
end

You don't need to use the update/draw/init functions that are available (and recommended, but not for this demo)

The computer is simply running cls() to clear the screen, pset() to draw the dot, and flip() to render it to the screen, and then it repeats those three commands indefinitely.

In game development, this can be called the "game loop" - because you have to update the game state and render it every frame. Often times you clear the screen first or you will combine the previous frame with the next one, which could be an unintended result.

Show me the trig!

I'll do more than show :) I'll do my best to explain how this works, but I'm not an expert so if I get something wrong or gloss over something critical please post a comment so I can update this.

Why Trig?

Before trig, if we wanted to figure out the x and y coordinates of something but all we had was its length, and angle, it would take a lot of steps to figure them out. Thankfully we don't have to do that anymore!

You might be wondering why we have to figure out x and y coordinates by length and angle. Our problem is really the fact that we have to find the x and y coordinates of something moving in a circle. Thinking about lengths and angles might not make sense at first, so let me help demistify this if I can.

Breaking our problem down

Inorder for us to move around in a circle, we need to establish a few things, can you think of some? You might want to pause before reading on, but if you want to go ahead :)

First we need to know the path our thing is traveling on. Since we know it is moving around in a circle, we can deduce that it will be traveling along the radius of the circle. Since it is traveling along a radius of a circle, then we need to decide how big our circle is.

Since the radius is how big the circle is from its center, we also have our length.

RADIUS=30

Second, if we want to have an idea of where it will be on the circle, we also need to decide where our circle will be. We can do this by assigning values to the origin of our circle, or the center of our circle.

I personally wanted my circle to be in the middle of the screen, and since the screen is 128x128 pixels in size, I'll just use half of that as my origin:

ORIGINX=64
ORIGINY=64

Last, inorder to plot where on my circle my thing will be, I need to know the angle. Since I just want something to go around in a circle over and over again, and angles go from 0 to 360 degrees, then we can just use zero and increment the angle over time to make it move:

ANGLE=0

Assuming we use the while(true) loop and want to move around on a circle, our script looks like this:

radius = 30
originx = 64
originy = 64
angle = 0

while(true) do
 angle += 5
 if (angle > 360) angle = 0
 cls()
 x=????????
 y=????????
 spr(0, x, y)
 flip()
end

The angle is incremented by 5 and reset to zero everytime we go over 360, so our thing will move. We use the spr function before flip to draw our sprite to the buffer. So the only thing missing is our x and y coordinates.

Here we basically have POLAR COORDINATES. We know the length, and the angle. The length is 30, the angle is constantly moving up then resetting.

Trig can be used to solve the following problems:

1. "I have the length and the angle, but I dont know the x and y coordinates"

This is the problem we are solving today :)

2. "I have the x and y coordinates, but I dont know the angle"

3. "I have the the length and the x and y coordinates, but I dont know the angle"

Get them X and Y Coordinates!

We use our friends SINE and COSINE. (and completely different than any other language LOL)

If you want to know how these really work, pico8 is not the best place. The reason is pico8 doesnt use them the same as you would use them in trig or in other languages. The good news is pico8 simplifies them, the bad is if you learn how to do this in pico8 and move on to another engine or programming language you will get a little confused.

If you are new to trigonometry check this out: https://www.raywenderlich.com/35866/trigonometry-for-game-programming-part-1

If you have experience using trig but dont really understand it, and also have a lot of programming experience or have a solid understanding of programming check out this article: http://www.helixsoft.nl/articles/circle/sincos.htm

If you read the second article, you might have a better understanding of why pico8 is different - you will also know how to draw circles without using trig as well. I strongly recommend reading both. I found the first article more helpful in understanding the basics of using trig, but only the first chapter. The second article was really good in understanding how cos and sin work.

In Pico8, sine and cosine work differently. You dont need to know PI or even RADIANS. Instead, you just need to know the angle in percent, meaning 100% or 1 is 360 degrees, and 0% or 0 is zero degrees.

 x=originx + radius * cos(angle/360)
 y=originy + radius * sin(angle/360)

Instead of using ANGLE, you can also just go from 0 to 1 (then reset at 0 when it goes over 1)

radius = 30
originx = 64
originy = 64
angle_percent = 0

while(true) do
 angle_percent += 0.03
 if (angle_percent > 1.00) angle_percent = 0
 cls()
 x=originx + radius * cos(angle_percent)
 y=originy + radius * sin(angle_percent)
 spr(0, x, y)
 flip()
end

That sums this tutorial up. I wanted to explain more about trig and triangles, but I would rather you read the articles I mentioned above. In programming you dont need to have a deep understanding of trig, you just need to know how to use practice trig. In order to practice trig though, you should be able to figure out how to solve problems using trig without copy pasting code. To do that, you're going to need to learn some trig, but most importantly learn how to solve problems using it, know how to use sine and cosine, and know what problems trig solves and what problems it doesnt. To do that, we need to practice it.

I hope this helped someone :) feel free to comment / critique / ask questions.

P#38978 2017-04-01 12:11 ( Edited 2017-04-01 20:36)

[ :: Read More :: ]

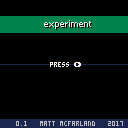
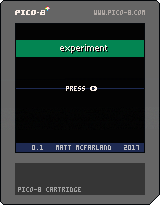
Here's a boilerplate I plan on using for prototyping different games.

It consists of a splash screen which transitions to the title screen, upon which the user is encouraged to press the play button. Once the button is pressed, the screen transitions to the "gameplay" state, which is nothing but a text greeting asking the user to press a button, which then results in transitioning to the gameover screen, and finally a press of the button returns the user back to the title screen.

This is a simple implementation of a Finite State Machine

Splash -> Title -> Game -> GameOver -> ...Title

Details

Demo

Cart #38951 | 2017-04-01 | Code ▽ | Embed ▽ | No License
3

P#38952 2017-03-31 23:00 ( Edited 2017-04-01 03:00)

[ :: Read More :: ]

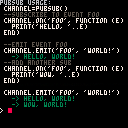
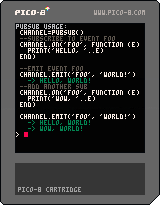
This is a tiny event system, sometimes called a "message bus"; or "bus" for short, and carries a similar API to the likes of the NodeJS Event Emitter - stripped down to the bare essentials: on, off, and emit

Usage:

--create a new emitter with the pubsub() function
emitter = pubsub()

--listen to an event
emitter.on("foo",  function (e) print('foo'..e) end )

--fire an event
emitter.emit('foo', { a='b' })

--working with handler references:
function onFoo() end
emitter.on('foo', onFoo)   // listen
emitter.off('foo', onFoo)  // unlisten

DEMO

Cart #38909 | 2017-03-31 | Code ▽ | Embed ▽ | License: CC4-BY-NC-SA
11

API

emit

Invoke all handlers for the given type.

Method emit(string, event)
parameter type description
type string The event type to invoke
evt any Any value (table is recommended), passed to each handler

--emit() example: 
channel.emit('awesomeness', stuff)

on

Register an event handler for the given type.

Method on(string, event)
parameter type description
type string String Type of event to listen for
handler Function Function to call in response to given event

--on() example:
channel.on('awesomeness', awesomeHandler)

off

Remove an event handler for the given type.

Method off(string, event)
parameter type description
type string Type of event to unregister handler from
handler Function Handler function to remove

--off() example:
channel.off('awesomeness', awesomeHandler)
P#38910 2017-03-31 05:44 ( Edited 2017-04-01 03:55)

[ :: Read More :: ]


P#38901 2017-03-31 01:45 ( Edited 2017-04-01 16:18)

Follow Lexaloffle:          
Generated 2024-04-19 13:52:22 | 0.076s | Q:21