


This tutorial is part 2 of a series. View part 1 here
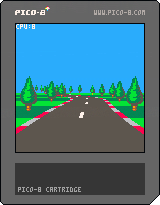
At the end of part one we had a basic road with corners.
Next we'll add some background objects along the sides of the road. Pseudo-3D racers commonly have objects like trees, houses and signs spaced along the side of the road to make things more interesting.
Adding trees
I've added a few sprites to play with. We'll start by adding this tree along each side, every 3 segments.
|
[128x32] |
Drawing is straightforward.
We can use the projected position and scale of the road at each segment to calculate the position and size of the tree to draw. Then we can pass this to the scale sprite command (sspr), and draw our tree.
For example:
if (sumct%3)==0 then local tx,ty=px-4.5*scale,py local tw,th=1.5*scale,3*scale sspr(8,0,16,32,tx-tw/2,ty-th,tw,th) end |
Will draw a 3x1.5 unit tree 4.5 units to the left of the center of the road (which is far enough to move it off the road).
However!
Because we draw the road front-to-back, we can't just draw the trees at the same time. They must be drawn in back-to-front order so that the near trees appear in front, and it looks correct.
So instead we must create an array of tree sprites:
local sp={} |
And add the position of each tree to the array inside the drawing loop:
if (sumct%3)==0 then
 -- left tree
 local tx,ty=px-4.5*scale,py
 local tw,th=1.5*scale,3*scale
 add(sp,{x=tx,y=ty,w=tw,h=th})

 -- right tree
 tx=px+4.5*scale
 add(sp,{x=tx,y=ty,w=tw,h=th})
end |
After the road is drawn, we have an array of tree positions in front-to-back order.
We can then loop through it backwards to draw them in back-to-front order.
for i=#sp,1,-1 do drawbgsprite(sp[i]) end |
function drawbgsprite(s) sspr(8,0,16,32,s.x-s.w/2,s.y-s.h,s.w,s.h) end |
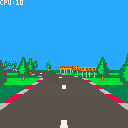
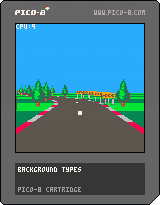
Putting it all together we get:
Different background types
Now that the basic logic is working, we can extend it to support different background types.
First we need to define the background types, with enough information to position them and draw them at the correct size:
bg_tree={
 img={8,0,16,32},	-- sprite image
 pos={1.5,0},     -- position rel 2 side of road
 siz={1.5,3},     -- size
 spc=3            -- spacing
}
bg_sign={
 img={80,0,32,32},
 pos={.5,0},
 siz={1.5,1.5},
 spc=1,
 flpr=true		      -- flip when on right hand side
} |
Now we can assign a background type to each corner. (bgl is for the left hand side, bgr is for the right).
road={
 {ct=10,tu=0,bgl=bg_tree,bgr=bg_tree},
 {ct=6,tu=-.25,bgl=bg_tree,bgr=bg_sign},
 {ct=8,tu=0,bgl=bg_tree,bgr=bg_tree},
 {ct=4,tu=.375,bgl=bg_sign,bgr=bg_tree},
 {ct=10,tu=0.05,bgl=bg_tree,bgr=bg_tree},
 {ct=4,tu=0,bgl=bg_tree,bgr=bg_tree},
 {ct=5,tu=-.25,bgl=bg_tree,bgr=bg_sign},
} |
We'll use this information to populate the "sp" array.
We need to store a little bit more than before, like the width and height and sprite image to draw.
To keep the main loop clean we can put it in a function:
function addbgsprite(sp,sumct,bg,side,px,py,scale)
 if(not bg)return
 if((sumct%bg.spc)~=0)return

 -- find position
 px+=3*scale*side
 if bg.pos then
 	px+=bg.pos[1]*scale*side
 	py+=bg.pos[2]*scale
 end

 -- calculate size
 local w,h=bg.siz[1]*scale,bg.siz[2]*scale

 -- flip horizontally?
 local flp=side>0 and bg.flpr

 -- add to sprite array
 add(sp,{
  x=px,y=py,w=w,h=h,
  img=bg.img,
  flp=flp
 })
end |
Note that the "side" parameter is -1 for objects on the left hand side and 1 for objects on the right.
We must call it from the main drawing loop. Once for the left hand side and once for the right:
addbgsprite(sp,sumct,road[cnr].bgl,-1,px,py,scale) addbgsprite(sp,sumct,road[cnr].bgr, 1,px,py,scale) |
And finally we need to change the drawbgsprite to handle the new format:
function drawbgsprite(s) sspr( s.img[1],s.img[2],s.img[3],s.img[4], s.x-s.w/2,s.y-s.h,s.w,s.h, s.flp) end |
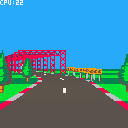
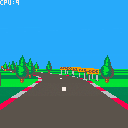
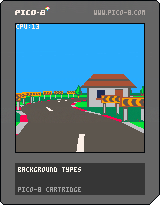
And now we have trees and signs:
Tweaking sprite scaling
Just a quick tweak to the sprite scaling before we continue. Feel free to skip this section if it doesn't interest you.
You might have noticed the trees sometimes float 1 pixel above the ground.
This is due to how sspr converts its parameters into integers before drawing. The projection and scaling calculations produce position and size values with a fractional component. The sspr command simply discards the fraction and rounds down to the nearest integer, for both the position and size parameters.
I prefer for it to render the pixels between the top and bottom values. For example if a sprite has a top of 1.9 and a bottom of 5.7, I want it to render on scan lines 2,3,4 and 5. This is how the road rendering has been implemented, and it ensures that the rendered segments fit together cleanly with no gaps or overlap.
sspr however will truncate 1.9 to 1 and the height (5.7-1.9=3.8) down to 3, then render it on scan lines 1,2,3,4. So it appears one pixel higher.
But we don't have to let sspr do the rounding. We can perform our own explicit rounding and tell sspr exactly which rows and columns we want our sprite stretched over.
In this case the ceil(1.9) gives me the scan line to start drawing (line 2) and ceil(5.7) gives the scan line to stop drawing (line 6). Subtracting the two gives the number of scan lines I want covered (4), which I can pass to sspr as the height.
And the logic is similar for horizontal columns.
Here's the updated drawbgsprite:
function drawbgsprite(s) local x1=ceil(s.x-s.w/2) local x2=ceil(s.x+s.w/2) local y1=ceil(s.y-s.h) local y2=ceil(s.y) sspr( s.img[1],s.img[2],s.img[3],s.img[4], x1,y1,x2-x1,y2-y1, s.flp) end |
And here's the result:
Bigger background objects
Scaled sprites work really well for background objects, but they can only get so big before we start to run out of Pico8 sprite space. A lot of pseudo 3D racers have nice big roadside objects like buildings and bridges to make things varied and interesting.
Pico8 has the sprite "map" where you can layout sprites to make much larger objects. So if we can scale sections of the map to the screen this would solve our problem. But Pico8 does not have a built in "scale map" command like sspr does for sprites.
Fortunately though, we can roll our own.
The idea is to loop over the map tiles and use the "mget" function to get the sprite for each position in the map. Then we can calculate its position and size on screen and use sspr to draw it.
function smap(mx,my,mw,mh,dx,dy,dw,dh)
 -- tile size on screen
 local tw,th=dw/mw,dh/mh

 -- loop over map tiles
 for y=0,mh-1 do
  for x=0,mw-1 do

   -- lookup sprite
   local s=mget(mx+x,my+y)

   -- don't draw sprite 0
   if s~=0 then

    -- sprite row and column index
    -- use to get sprite image coords
    local sc,sr=s%16,flr(s/16)		-- 16 sprites per row
    local sx,sy=sc*8,sr*8	      -- 8x8 pixels per sprite

    -- sprite position on screen
    local x1=ceil(dx+x*tw)
    local y1=ceil(dy+y*th)
    local x2=ceil(dx+x*tw+tw)
    local y2=ceil(dy+y*th+th)

    -- scale sprite
    sspr(sx,sy,8,8,
         x1,y1,x2-x1,y2-y1)
   end
  end
 end
end |
mx,my,mw,mh are the map coordinates in cells. dx,dy,dw,dh are the screen coordinates to draw.
We can test this function by typing (in immediate mode):
smap(0,0,8,5,0,0,128,128) |
Which should draw a scaled house across the screen.
Armed with our new function, we can add some houses to our map. This takes a little bit of plumbing.
First we define a background type for it:
bg_house={
 mp={0,0,8,5},			 -- map image (x,y,w,h in tiles)
 pos={3.5,0},
 siz={6,3.5},
 spc=4
} |
And add some houses to the end of our road:
road={
 {ct=10,tu=0,bgl=bg_tree,bgr=bg_tree},
 {ct=6,tu=-.25,bgl=bg_tree,bgr=bg_sign},
 {ct=8,tu=0,bgl=bg_tree,bgr=bg_tree},
 {ct=4,tu=.375,bgl=bg_sign,bgr=bg_tree},
 {ct=10,tu=0.05,bgl=bg_tree},
 {ct=4,tu=0,bgl=bg_tree,bgr=bg_tree},
 {ct=5,tu=-.25,bgl=bg_tree,bgr=bg_sign},
 {ct=12,tu=0,bgl=bg_house,bgr=bg_house},
 {ct=8,tu=-.5,bgl=bg_house,bgr=bg_sign},
 {ct=8,tu=.5,bgl=bg_sign,bgr=bg_house},
} |
We need to copy the "mp" property when we write the entry into the "sp" sprite array, in the "addbgsprite" function:
 -- add to sprite array
 add(sp,{
  x=px,y=py,w=w,h=h,
  img=bg.img,
  mp=bg.mp,
  flp=flp
}) |
The last step is to update "drawbgsprite" to call our smap function when it receives a sprite with an "mp" property:
function drawbgsprite(s)
 if s.mp then
  smap(s.mp[1],s.mp[2],s.mp[3],s.mp[4],
       s.x-s.w/2,s.y-s.h,s.w,s.h)
 else
  local x1=ceil(s.x-s.w/2)
  local x2=ceil(s.x+s.w/2)
  local y1=ceil(s.y-s.h)
  local y2=ceil(s.y)
 	sspr(s.img[1],s.img[2],s.img[3],s.img[4],
     		x1,y1,x2-x1,y2-y1,
     		s.flp)
 end
end |
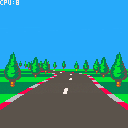
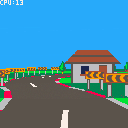
Putting it all together gives:
It should be kept in mind that scaling a map results in a lot of sspr calls. Our 8x5 tile house has 40 sprites to draw (well really 38, as it skips the blank top left and right tiles). A larger building could have 100,200 or more.
So it's worth keeping an eye on the CPU usage to make sure Pico-8 isn't going to max out, and maybe space larger objects out a bit more.
Having said that, we're still only at 17% CPU tops, so Pico-8 definitely has the ability to handle a decent amount of scenery.
Bridges and beams
To finish off let's add some metal beams for the player to drive underneath. This will be a centered background object, which means it's technically in the middle of the road. However because the beam object is wider than the road and is essentially bridge shaped, the camera will drive through/underneath it, instead of crashing into it.
We have most of what we need already. We'll define a background type:
bg_beams={
 mp={8,0,16,8},
 siz={10,5},
 spc=2
} |
And add it to our road, using "bgc" to indicate it's a centered background object.
road={
 {ct=10,tu=0,bgl=bg_tree,bgr=bg_tree},
 {ct=6,tu=-.25,bgl=bg_tree,bgr=bg_sign},
 {ct=8,tu=0,bgl=bg_tree,bgr=bg_tree},
 {ct=4,tu=.375,bgl=bg_sign,bgr=bg_tree},
 {ct=10,tu=0.05,bgl=bg_tree},
 {ct=4,tu=0,bgl=bg_tree,bgr=bg_tree},
 {ct=5,tu=-.25,bgl=bg_tree,bgr=bg_sign},
 {ct=15,tu=0,bgc=bg_beams},
 {ct=12,tu=0,bgl=bg_house,bgr=bg_house},
 {ct=8,tu=-.5,bgl=bg_house,bgr=bg_sign},
 {ct=8,tu=.5,bgl=bg_sign,bgr=bg_house},
} |
In the main drawing loop, we'll add another call to "addbgsprite" for centered objects:
-- add background sprites addbgsprite(sp,sumct,road[cnr].bgl,-1,px,py,scale) addbgsprite(sp,sumct,road[cnr].bgr, 1,px,py,scale) addbgsprite(sp,sumct,road[cnr].bgc, 0,px,py,scale) |
By passing 0 as the "side" parameter we cancel out any horizontal positioning, so that it ends up in the middle of the road.
And that's all we need to do:
Next steps
And that's it for part 2. Part 3 is about creating hills and tunnels.


I don't have time at the moment to follow this tutorial, but it's definitely awesome you're taking the time to do this. Thanks!
I haven't finished yet, but I was curious if you could post your sprite page. Trying to debug and I'm thinking I might be putting my sign in the wrong section. Either way, loving this so far, thank you!
You can always download the cart to grab the sprites. But here's them exported to png:
I don't know that there's an easy way to export the map though(?)
[Please log in to post a comment]