


In the last post, we looked at some basic animation, collision and AI examples. In this one, we're going to take it a few steps further and improve upon these functions.
During the development of my game (tentatively titled "Castle of Thunder", which is a port of INTV's Thunder Castle), I realized that I was going to need some more advanced functionality, because the first enemy is a total of 4 sprites when walking horizontally, and 2 sprites when working vertically. Since we had all of our animation stepping, animation speed, frame numbers, etc stored as properties of our actor in our simple animation demo, it works great for 8x8 actors, but not as well when that actor is comprised of several sprites.
Further, I found that I needed to be able to specify x and y offsets for actors with multiple sprites, so that subsequent sprites can have custom positioning and aren't drawn on top of the first. I also needed a way to reset interrupted animations, so that when they start again, they don't start where they left off when they were interrupted. Finally, I needed a way to stop animations that aren't supposed to loop, as well as set a custom frame for when the animation is stopped, and set flipping for both x and y. That's a lot of added functionality, so I decided to rewrite the animation function from scratch, and instead of passing it a million parameters, we could pass it an object/table containing all of these options.
The object that we pass to the new animation function will be properties of the actor object. So basically, each animation will have its own table filled with all of the options for that animation. Here's an example:
e1={ -- enemy 1
  anim={
    play={}, -- currently playing
    walklrh={}, -- walk l/r head
    walklrb={}, -- walk l/r body
    walklrt={}, -- walk l/r tail
    walklrf={}, -- walk l/r fire
    walkuh={}, -- walk up head
    walkut={}, -- walk up tail
    walkdh={}, -- walk down head
    walkdt={}, -- walk down tail
    deathh={}, -- death head
    deathb={}, -- death body
    deatht={}  -- death tail
  }
}

e1a=e1.anim

-- sets up each anim with default options
-- we do this so eo don't have to set each one
-- individually above, to save lots of tokens
for k in pairs(e1a) do
  e1a[k].start=0 -- starting frame
  e1a[k].frames=4 -- number of frames in animation
  e1a[k].speed=7 -- animation speed
  e1a[k].flipx=false -- flip x
  e1a[k].flipy=false -- flip y
  e1a[k].loop=true -- loop animation?
  e1a[k].reset=false -- a frame, if you want to stop on a specific frame
  e1a[k].step=0 -- step counter, used to set anim speed
  e1a[k].current=0 -- current frame
end

-- set custom options where needed

-- walk left/right
e1a.walklrh.start=36 -- head
e1a.walklrb.start=40 -- body
e1a.walklrt.start=44 -- tail
e1a.walklrf.start=48 -- fire

-- walk up
e1a.walkuh.start=60 -- head
e1a.walkut.start=56 -- tail
e1a.walkut.flipy=true

-- walk down
e1a.walkdh.start=52 -- head
e1a.walkdt.start=56 -- tail

-- death
e1a.deathh.start=64 -- head
e1a.deathh.loop=false
e1a.deathb.start=68 -- body
e1a.deathb.loop=false
e1a.deatht.start=72 -- tail
e1a.deatht.loop=false
|
Of course, you can also change any of these options dynamically at any time throughout the game if certain conditions are met or whatever. For example, my "walklr" animations are the same for walking left or right, but my sprites are facing right. I just check if the enemy is walking left, and set "flipx" to true on the "walklr" animations, and false again if he's walking right. Similarly, if he's walking up, his tail is flipped on the y axis.
Here's the final animation function:
function anim(a,anim,offx,offy)
  local sta=anim.start
  local cur=anim.current
  local stp=anim.step
  local spd=anim.speed
  local flx=anim.flipx
  local fly=anim.flipy
  local lop=anim.loop

  anim.step+=1
  if(stp%flr(30/spd)==0)	cur+=1
  if(cur==anim.frames) then
    if(lop) then cur=0
    else cur-=1 end
  end

  anim.current=cur
  a.anim.play=anim

  if(not offx) offx=0
  if(not offy) offy=0
  -- draw the sprite
  spr(sta+cur,a.x+offx,a.y+offy,1,1,flx,fly)
end
|
It's not that much bigger than the simple version, but it's way more powerful. To call it for your huge enemy, you'd do something like this:
local an=e1.anim anim(e1,an.walklrf,-8) -- fire anim(e1,an.walklrh) -- head anim(e1,an.walklrb,8) -- body anim(e1,an.walklrt,16) -- tail |
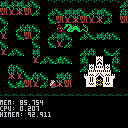
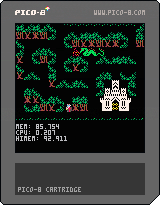
Here's a demo:

In this demo, the player can walk around, while the enemy just cycles through his walking animations every 5 seconds. Press Z to toggle the player being in a "dead" state.
In the next part, we're going to talk about more advanced movement and collisions (and how they relate to each other), and get back into AI. They are already in the demo (except for the AI) if you'd like to get a head start, but are a topic for another blog entry. Stay tuned for those!
P.S. - You are free to use any of the code provided, but please don't use the graphics, as they are being used in my upcoming game. Thanks!


Hi Scathe,
These are great tutorials. Thank you for sharing!

[Please log in to post a comment]