


# Picotéras
by Fuchikoma71
Introduction:
As Eriban, fellow Pico-8 developer and code optimiser extraordinaire (very much unlike me) once observed, I have a habit of creating the completely wrong kind of Pico-8 games: slow-paced, physically accurate, complex and austere simulators. Picotéras is the latest in this slowly extending line of misfits.
I have long held the ambition of creating some sort of 4X analogue in Pico-8. However, it quickly became obvious that compromise would be necessary to make it playable. I ended up keeping the gigantic scale, every game spanning centuries (or even millenia) and dozens of star systems, but simplifying the core mechanics of the genre.
So instead of controlling some galactic power, the player is in charge of a single orbital habitat capable of interstellar travel. By way of analogy: you are leading a nomadic tribe of eXplorers, not an eXpanding empire.
Accordingly, eXploitation involves keeping your orbital alive by harvesting the necessessary resources on your interstellar journey, while eXtermination consists in defending it against hostile robotic swarms (possibly through pre-emptive strike).
The name of the game is obviously a wordplay on Voltaire’s “Micromégas”, which could be described either as an 18th century space opera, or as a playful treatise on the relativity of scale.
Universe:
By design, Picotéras is meant to be as open-ended as possible, allowing the player to write their own civilisation’s history. However, there are inevitably some constants imposed by the game’s mechanincs (or by the limits of my imagination, take your pick).
First and foremost, the Picotéras universe has periodic boundary conditions, which means it is donut-shaped: traveling to the “east” simply causes you to re-enter from the “west” and vice versa (the same applies to “north” and “south”).
Second, it obeys some basic laws of physics. Every star has a gravitational pull proportional to its mass and inversely proportional to the square of the distance (above a certain range, this force is set to zero for simplicity). Crashing on a star is (surprise, surprise) fatal to your orbital habitat, so learning how to navigate gravitational fields successfully is essential and, according to Terizian (my playtester), quite challenging!
There are 3 types of stars in Picotéras: red dwarves, yellow suns and blue giants. Orbiting each type of star allows you to harvest one of the three resources modeled in the game: red dwarves can be “mined” for raw materials to build up your swarm of defensive drones (more on this below), yellow suns let you restore your habitat’s biosphere (which slowly deteriorates over time), and massive blue giants allow you to replenish the gravitational energy used to propel your orbital from star to star.
Aside from piloting error, which can result in collision with a star, or poor planning, which can cause you to run out of energy or lead to your habitat’s biosphere deteriorating to the point where it can no longer support life, danger to the orbital comes from hostile robotic swarms.
Robotic swarms roam the Picotéras universe, traveling from star to star much in the same way that you do. Nobody knows exactly where they came from, but they are probably the remnants of a long gone alien civilisation. Some are benign (or rather indifferent to your presence unless provoked), but others seemingly hold a grudge against biological life. Those will attack and hunt you down until eliminated. Each robotic drone reaching the orbital will ravage its biosphere, halving the corresponding variable. You may be tempted to think of these doomsday devices as missiles, but a more accurate analogy would be pollutants or an artificial virus. They do not detonate on impact: they break down into trillions of nanomachines that effectively poison the environment.
Your best and only defense comes from your own swarm of sentry drones. These drones, which are built automatically when orbiting a red dwarf, escort your habitat and, when activated, seek and destroy their robotic counterparts (hostile or otherwise). Robotic drones also harvest red dwarf resources to build up their numbers and, when reaching critical size, split into two independent swarms (although they cannot exceed a total number determined by the size of the map).
Controls and interface:
At the very beginning of the game, the player is asked to choose a universe size. The options are 60x60, 80x80 or 100x100. The star and maximum swarm densities are constant (so the corresponding number increases with size). There’s always at least one star of each type, but usually several more. Red dwarves are more common than yellow suns, while blue giants are the rarest. Choose the desired size using the up and down arrows, then hit “x” to start the initialisation process. If you select the largest map, be prepared to play for a while before reaching any kind of victory (NB: 100x100 is almost three times bigger than 60x60!).
In-game, the arrow keys are used to control “thrusters” (in fact, these are relativistic engines that bend the space-time continuum, causing the orbital to “slide” into the desired direction of travel, but that’s a geeky detail). They are used to accelerate or slow down and consume gravitational energy.
Holding down the “z” key causes the sentry drones (if any) to go to high alert, which essentially means that one of them will be dispatched to attack the nearest robotic swarm every second (note that a second is a year in game time). Once a drone reaches its target, both are eliminated, so keep in mind that war is costly: if you run out of sentries before a pursuing swarm has been wiped out, you are in big trouble!
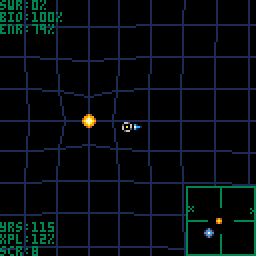
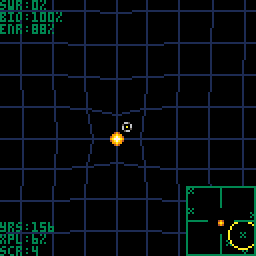
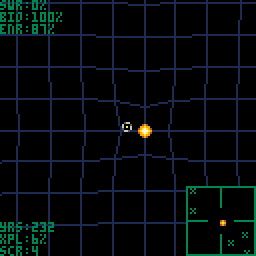
The main display shows your orbital habitat in the centre, nearby stars and all swarms within range (robotic and sentry drones). Blue gridlines help you visualise the geometry of space around you (they are distorted in the vicinity of stars). On the top left corner is a datablock displaying the value of the three key variables measuring the orbital’s “health”. These are: Swarm (SWR), Biosphere (BIO) and Energy (ENR). All are expressed as a percentage of the maximum. In the case of the swarm, the highest allowed number of sentry drones is 32. When SWR or ENR fall below 25%, they start flashing to attract attention.
Individual drones are represented by a colour code. Robotic units can be yellow (unknown or hostile but unaware of your presence), purple (identified as friendly), orange (identified as hostile and aware of your presence) or red (hostile and on an attack vector). Your own sentries are dark green when on low alert, bright green when instructed to seek and destroy nearby targets (“z” key down).
The bottom left corner displays some information about your progress, namely the number of years you have survived (YRS), the percentage of solar systems explored (XPL) and your current score (SCR). The score goes up for every hostile drone destroyed (you gain 10 points bonus for eliminating an entire hostile swarm) and for every star visited. It goes down by the same amount when destroying/eliminating neutral drones/swarms.
The bottom right corner contains a “mini-map” showing some information about the space beyond the boundaries of the main display. Stars that have already been visited are represented by red, yellow and blue icons. The location of “undiscovered” stars is marked by a green cross. Swarms appear as pulsating “radar blips”: yellow for unknown, purple for friendly/indifferent, red for hostile. In addition, if no red dwarf, yellow sun or blue giant is present but at least one has been visited before, an arrow of the corresponding colour is displayed at the edge of the mini-map to indicate the direction of the nearest one (this feature comes handy when you must quickly find a source of a critically depleted resource).
The data overlay can be toggled on or off by pressing the “x” key.
Victories:
In the purest 4X tradition, there are multiple victories:
1. “Warrior” victory: all hostile robotic swarms have been eliminated
2. “Exterminator” victory: all robotic swarms, hostile or friendly, have been destroyed
3. “Explorer” victory: 100% of stars have been visited
4. “Conqueror” victory: a combination of “Explorer” and “Warrior” victories
5. “Diplomat” victory: “Warrior” victory, contact established with every neutral swarm and none of these was completely wiped out (the odd “collateral” is allowed)
6. “Pacifist” victory: reach “Explorer” victory without destroying a single robotic drone
7. “Survivor” victory: your journey reached the 2000 years mark
8. “Philosopher” victory: a combination of “Conqueror”, “Diplomat” and “Survivor” victories
Victories come with a score multiplier proportional to their difficulty (1-4: the multiplier is 2, 5-7: the multiplier is 4, 8: the multiplier is 8). When you reach any victory, the game pauses and the final score (alongside some statistics) is displayed. The same happens if your orbital habitat is destroyed, only this is obviously not a successful outcome!
With all but the highest (“Philosopher”) victory, you are given the option to continue playing by pressing the “x” key. Note that the end screen for any one given victory is only displayed once, so if you choose to continue, you’ll have to keep playing until the next victory is achieved or the orbital is destroyed (caution: in the latter case, your initial victory is cancelled).


Two-fold congratulations! First, for the birth of this game. It's indeed very much recognizable as a game by your hand. I fear this will not become a blockbuster either, but it's well-made and hopefully will find some fans in the niche market of low-rez, slow-play sim-games. Hopefully they are not scared by a bit of introductory text. It's a nice opening screen by the way.
In my initial go I managed to collect a full swarm of defensive drones and replenish my biosphere, but crashed into a star before encountering any robotic swarm. I'll give it another go later, but first have my own programming project to tend to...
Thanks eriban! Yes, orbital manoeuvering can be quite tricky... You must get the hang of it as they say. I hardly ever crash anymore, but I still frequently run too close to a swarm and lose the game that way (once they're after you, you're pretty much done for! ;-)

Okay but how do you mine a planet?? I keep running out of energy and dying, and I've read your instructions twice so I feel like I'm taking crazy pills.
You mine a star by entering orbit around it. While orbiting (within two squares or so: mining rate is inversely proportional to distance, so the narrower the orbit, the faster the resource is harvested), the corresponding variable (blue star=enr, yellow star=bio, red star=swr) increases automatically.
I must be doing it wrong then, because it takes me literally ten minutes to charge up my enr. I spend just as much trying to get in a relatively stable orbit as I get from going near it. Is it even possible to get in an orbit that's totally stable and doesn't need constant correction?

This is a lot of fun, I really enjoy the orbital mechanics and thinking about all of the philosophical implications of hurtling through empty space over centuries gets me in the writing mood. Still working on getting the Philosopher victory!
Some criticisms, though. I think you might have the (o) and (x) buttons flipped around backwards, since (x) corresponds to X on the keyboard. I wonder if having some kind of orbit-visualiser would go a long way in making the game more accessible and take out the guesswork in simple rocket science. Another improvement would be to replace the "remove info" option with a "slow time" option, since past a certain distance it's basically impossible to escape orbits safely.
@snaxmcgee It's possible to make a stable, circular orbit. What you want to do is:
- Slow down as you approach the star and get an elliptical orbit.
- Orbit a few times to get an idea of where my "periapsis" (closest part of the orbit to the star) and "apiapsis" (farthest) are.
- Boost at the periapsis in the opposite direction of the orbit to bring the apiapsis closer. Be sure to do small taps, since a little thrust goes a long way.
- If the periapsis is too close for comfort, boost in the same direction as the orbit at the apiapsis.
- Repeat 3 and 4 until it's a circle of the size of your liking.
- To exit orbit safely and efficiently, basically "slingshot" off the star by boosting in the direction of the orbit before you actually exit at a tangent.
I realise this is sort of obtuse, so I've included some GIFs.
Approach and Ellipse:
Adjust Orbit:
Take Off:
Hi Dther99 and thanks for your kind comments. Thanks also for following up on the previous thread and for posting the videos (I was planning something similar but got lazy! ;-)
You may be right about the (o) and (x) buttons being mixed-up (I'll check).
Orbit visualisation would be nice but might be tricky to add to Picotéras. There's quite a bit going on as it is and adding trajectory calculations might be a bit much for Pico-8 (I'm not much of a code optimiser as I've said before).
Such a feature was available in my first game though (Pic-orion) and you'll hopefully be glad to know it might be back for my next project...
[Please log in to post a comment]