


Overview
So the other day I delved deep into trig to pull out the bare minimum of what makes things move in circles.
The problem I've had in the past is that I often looked at games or demos that incorporated a lot more things, so I often would make incorrect assumptions about how to implement these types of things. My hope with this tutorial is to just show you the absolute bare minimum of what you need to get a sprite moving in a counter-clockwise circle, and explain everything line by line as best I can.
Here is what we are making:

To make something move in a circle, we have to use trigonometry. This tutorial is going to explain the trig functions we'll be using so that you can hopefully use them on your own without copy and pasting.
Prerequisites
To get the most out of this tutorial, you just need pico8 installed.
The gist
A sprite moving in a counterclockwise circle
radius = 30 originx = 64 originy = 64 angle = 0 while(true) do angle += 5 if (angle > 360) angle = 0 cls() x=originx + radius * cos(angle/360) y=originy + radius * sin(angle/360) spr(0, x, y) flip() end |
Rendering with pico8
NOTE: Skip this section if you want to get right to the trig! Just go to "Show me the trig!"
The thing I love about pico8 is that it doesn't get in your way! I can throw up an app that says draws a dot in the center of the screen its easy
Should you run the following script, you will see a dot in the middle of the screen
while(true) do cls() pset(64, 64) flip() end |
You don't need to use the update/draw/init functions that are available (and recommended, but not for this demo)
The computer is simply running cls() to clear the screen, pset() to draw the dot, and flip() to render it to the screen, and then it repeats those three commands indefinitely.
In game development, this can be called the "game loop" - because you have to update the game state and render it every frame. Often times you clear the screen first or you will combine the previous frame with the next one, which could be an unintended result.
Show me the trig!
I'll do more than show :) I'll do my best to explain how this works, but I'm not an expert so if I get something wrong or gloss over something critical please post a comment so I can update this.
Why Trig?
Before trig, if we wanted to figure out the x and y coordinates of something but all we had was its length, and angle, it would take a lot of steps to figure them out. Thankfully we don't have to do that anymore!
You might be wondering why we have to figure out x and y coordinates by length and angle. Our problem is really the fact that we have to find the x and y coordinates of something moving in a circle. Thinking about lengths and angles might not make sense at first, so let me help demistify this if I can.
Breaking our problem down
Inorder for us to move around in a circle, we need to establish a few things, can you think of some? You might want to pause before reading on, but if you want to go ahead :)
First we need to know the path our thing is traveling on. Since we know it is moving around in a circle, we can deduce that it will be traveling along the radius of the circle. Since it is traveling along a radius of a circle, then we need to decide how big our circle is.
Since the radius is how big the circle is from its center, we also have our length.
RADIUS=30 |
Second, if we want to have an idea of where it will be on the circle, we also need to decide where our circle will be. We can do this by assigning values to the origin of our circle, or the center of our circle.
I personally wanted my circle to be in the middle of the screen, and since the screen is 128x128 pixels in size, I'll just use half of that as my origin:
ORIGINX=64 ORIGINY=64 |
Last, inorder to plot where on my circle my thing will be, I need to know the angle. Since I just want something to go around in a circle over and over again, and angles go from 0 to 360 degrees, then we can just use zero and increment the angle over time to make it move:
ANGLE=0 |
Assuming we use the while(true) loop and want to move around on a circle, our script looks like this:
radius = 30 originx = 64 originy = 64 angle = 0 while(true) do angle += 5 if (angle > 360) angle = 0 cls() x=???????? y=???????? spr(0, x, y) flip() end |
The angle is incremented by 5 and reset to zero everytime we go over 360, so our thing will move. We use the spr function before flip to draw our sprite to the buffer. So the only thing missing is our x and y coordinates.
Here we basically have POLAR COORDINATES. We know the length, and the angle. The length is 30, the angle is constantly moving up then resetting.
Trig can be used to solve the following problems:
1. "I have the length and the angle, but I dont know the x and y coordinates"
This is the problem we are solving today :)
2. "I have the x and y coordinates, but I dont know the angle"
3. "I have the the length and the x and y coordinates, but I dont know the angle"
Get them X and Y Coordinates!
We use our friends SINE and COSINE. (and completely different than any other language LOL)
If you want to know how these really work, pico8 is not the best place. The reason is pico8 doesnt use them the same as you would use them in trig or in other languages. The good news is pico8 simplifies them, the bad is if you learn how to do this in pico8 and move on to another engine or programming language you will get a little confused.
If you are new to trigonometry check this out: https://www.raywenderlich.com/35866/trigonometry-for-game-programming-part-1
If you have experience using trig but dont really understand it, and also have a lot of programming experience or have a solid understanding of programming check out this article: http://www.helixsoft.nl/articles/circle/sincos.htm
If you read the second article, you might have a better understanding of why pico8 is different - you will also know how to draw circles without using trig as well. I strongly recommend reading both. I found the first article more helpful in understanding the basics of using trig, but only the first chapter. The second article was really good in understanding how cos and sin work.
In Pico8, sine and cosine work differently. You dont need to know PI or even RADIANS. Instead, you just need to know the angle in percent, meaning 100% or 1 is 360 degrees, and 0% or 0 is zero degrees.
x=originx + radius * cos(angle/360) y=originy + radius * sin(angle/360) |
Instead of using ANGLE, you can also just go from 0 to 1 (then reset at 0 when it goes over 1)
radius = 30 originx = 64 originy = 64 angle_percent = 0 while(true) do angle_percent += 0.03 if (angle_percent > 1.00) angle_percent = 0 cls() x=originx + radius * cos(angle_percent) y=originy + radius * sin(angle_percent) spr(0, x, y) flip() end |
That sums this tutorial up. I wanted to explain more about trig and triangles, but I would rather you read the articles I mentioned above. In programming you dont need to have a deep understanding of trig, you just need to know how to use practice trig. In order to practice trig though, you should be able to figure out how to solve problems using trig without copy pasting code. To do that, you're going to need to learn some trig, but most importantly learn how to solve problems using it, know how to use sine and cosine, and know what problems trig solves and what problems it doesnt. To do that, we need to practice it.
I hope this helped someone :) feel free to comment / critique / ask questions.


Just a few questions. Why do you want to reset the number to 0 once it reaches 360, that only seems to take more characters without a benefit. Also, why are you increment the angle by 5, then dividing it by 360? Why not just increment by something smaller?
Hi,
Just wanted to say that your post was tremendously helpful. It along with this tutorial http://allenchou.net/2019/08/trigonometry-basics-sine-cosine/ really helped me to understand sin and cos and their implementation a lot better. So thanks for that!
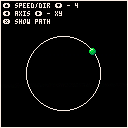
While running through your tutorial, I put a little cart together to help me visualize what I was learning. You're able to set the speed and direction of the movement, change the axis and also show the path the object is moving on/around. I've included it below.
Thanks again!

[Please log in to post a comment]