


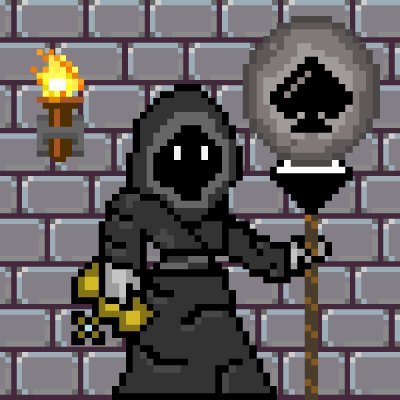
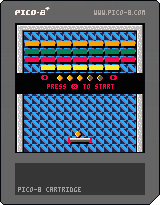
I'm excited to introduce Bob of Thunder, my entry to Toy Box Jam 2!
This is probably my most ambitious cart in terms of process: it borrows heavily from the techniques I used in Astro Clerk in The Documents of Mars last year, but it has a considerably larger map requiring compression, more in terms of scripted events, and took way more planning. I plan to write up some of the more interesting parts later on.
The Story So Far
Instructions
Bob will acquire several items as his workday progresses. He can touch most signs, notes, or villagers to see what they have to say, and you can press Z/Square on switches or hit them with your hammer to activate them.
Z/Square - Throw Ljessnir
X/Cross - Use Secondary Items
The game will autosave as you progress, most often when you cross a screen boundary or enter/exit a room.
Credits
Changes
Revision 1: Adjusted the difficulty for the last challenge.
Revision 2: Fix the color scheme on one of the NPCs
Revision 3: Fix some missing dialog colors
Revision 4: Adjust layout of rooms in the last challenge.
 11 comments

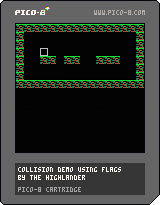
Just a short demo of how to draw a map, place a sprite and detect collisions with the map.
Make sure the map has sprites with flag 0 set to true.
On each update the player's input is read and that new location is checked for a sprite with flag 0 set.
If true, a collision is detected and the previous x and y position of the player are restored.

Hey!
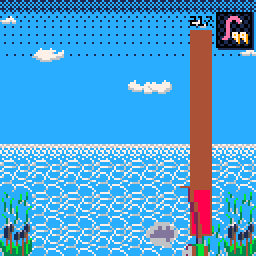
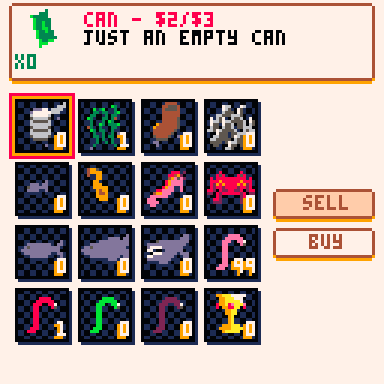
This is my first PICO8 game that I've created while learning the basics of PICO8.

SimpleTsuri is a fishing simulator, your goal is to gather enough money to buy the trophy!
Press Z to cast your rod/dismiss a box/accept your selection.
Press X to switch to shop-inventory hybrid.
UP and DOWN selects your bait type or buy/sell option in shop-inventory.
LEFT and RIGHT moves your rod or selects an item in shop-inventory.

It might not have the best... anything but seeing as it was made as a learning exercise, still pretty proud of it.

Controls
How to Play
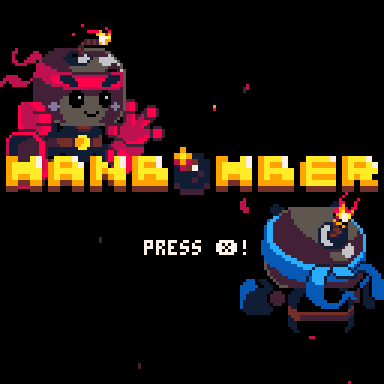
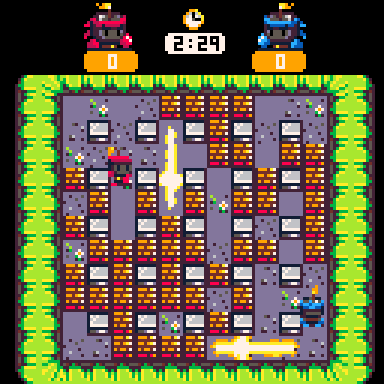
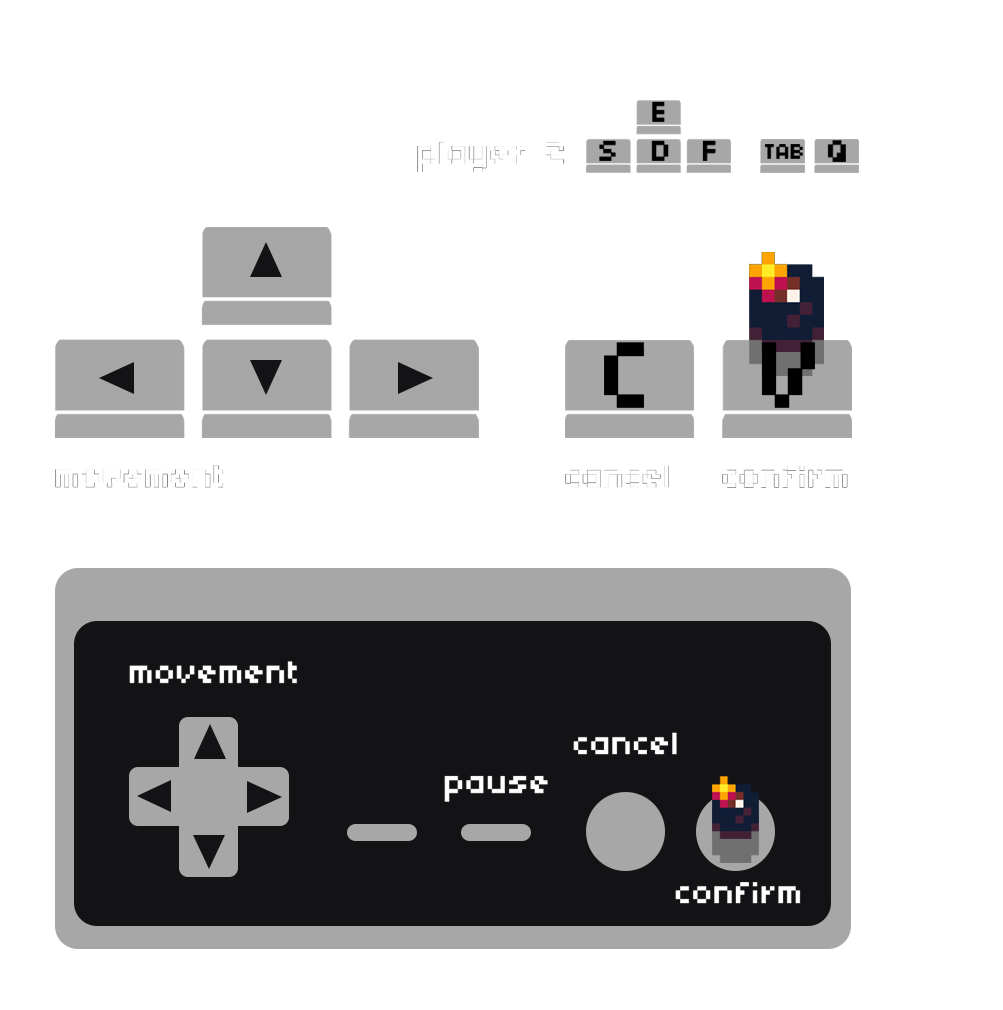
Welcome to Manbomber, an explosive homage to the old-time multiplayer classic made with PICO-8! In this game, your goal is to drop bombs on the battlefield to eliminate all other players in time and be the last manbomber standing.
The game can be played with up to 4 players battling each other. While in the 2-player mode, both players can use the same keyboard to control their manbomber, a controller for each player is required for all other modes. Any Controller which can be connected to your device will do!
So grab a couple of friends, choose one of the three battlefields and blast off!
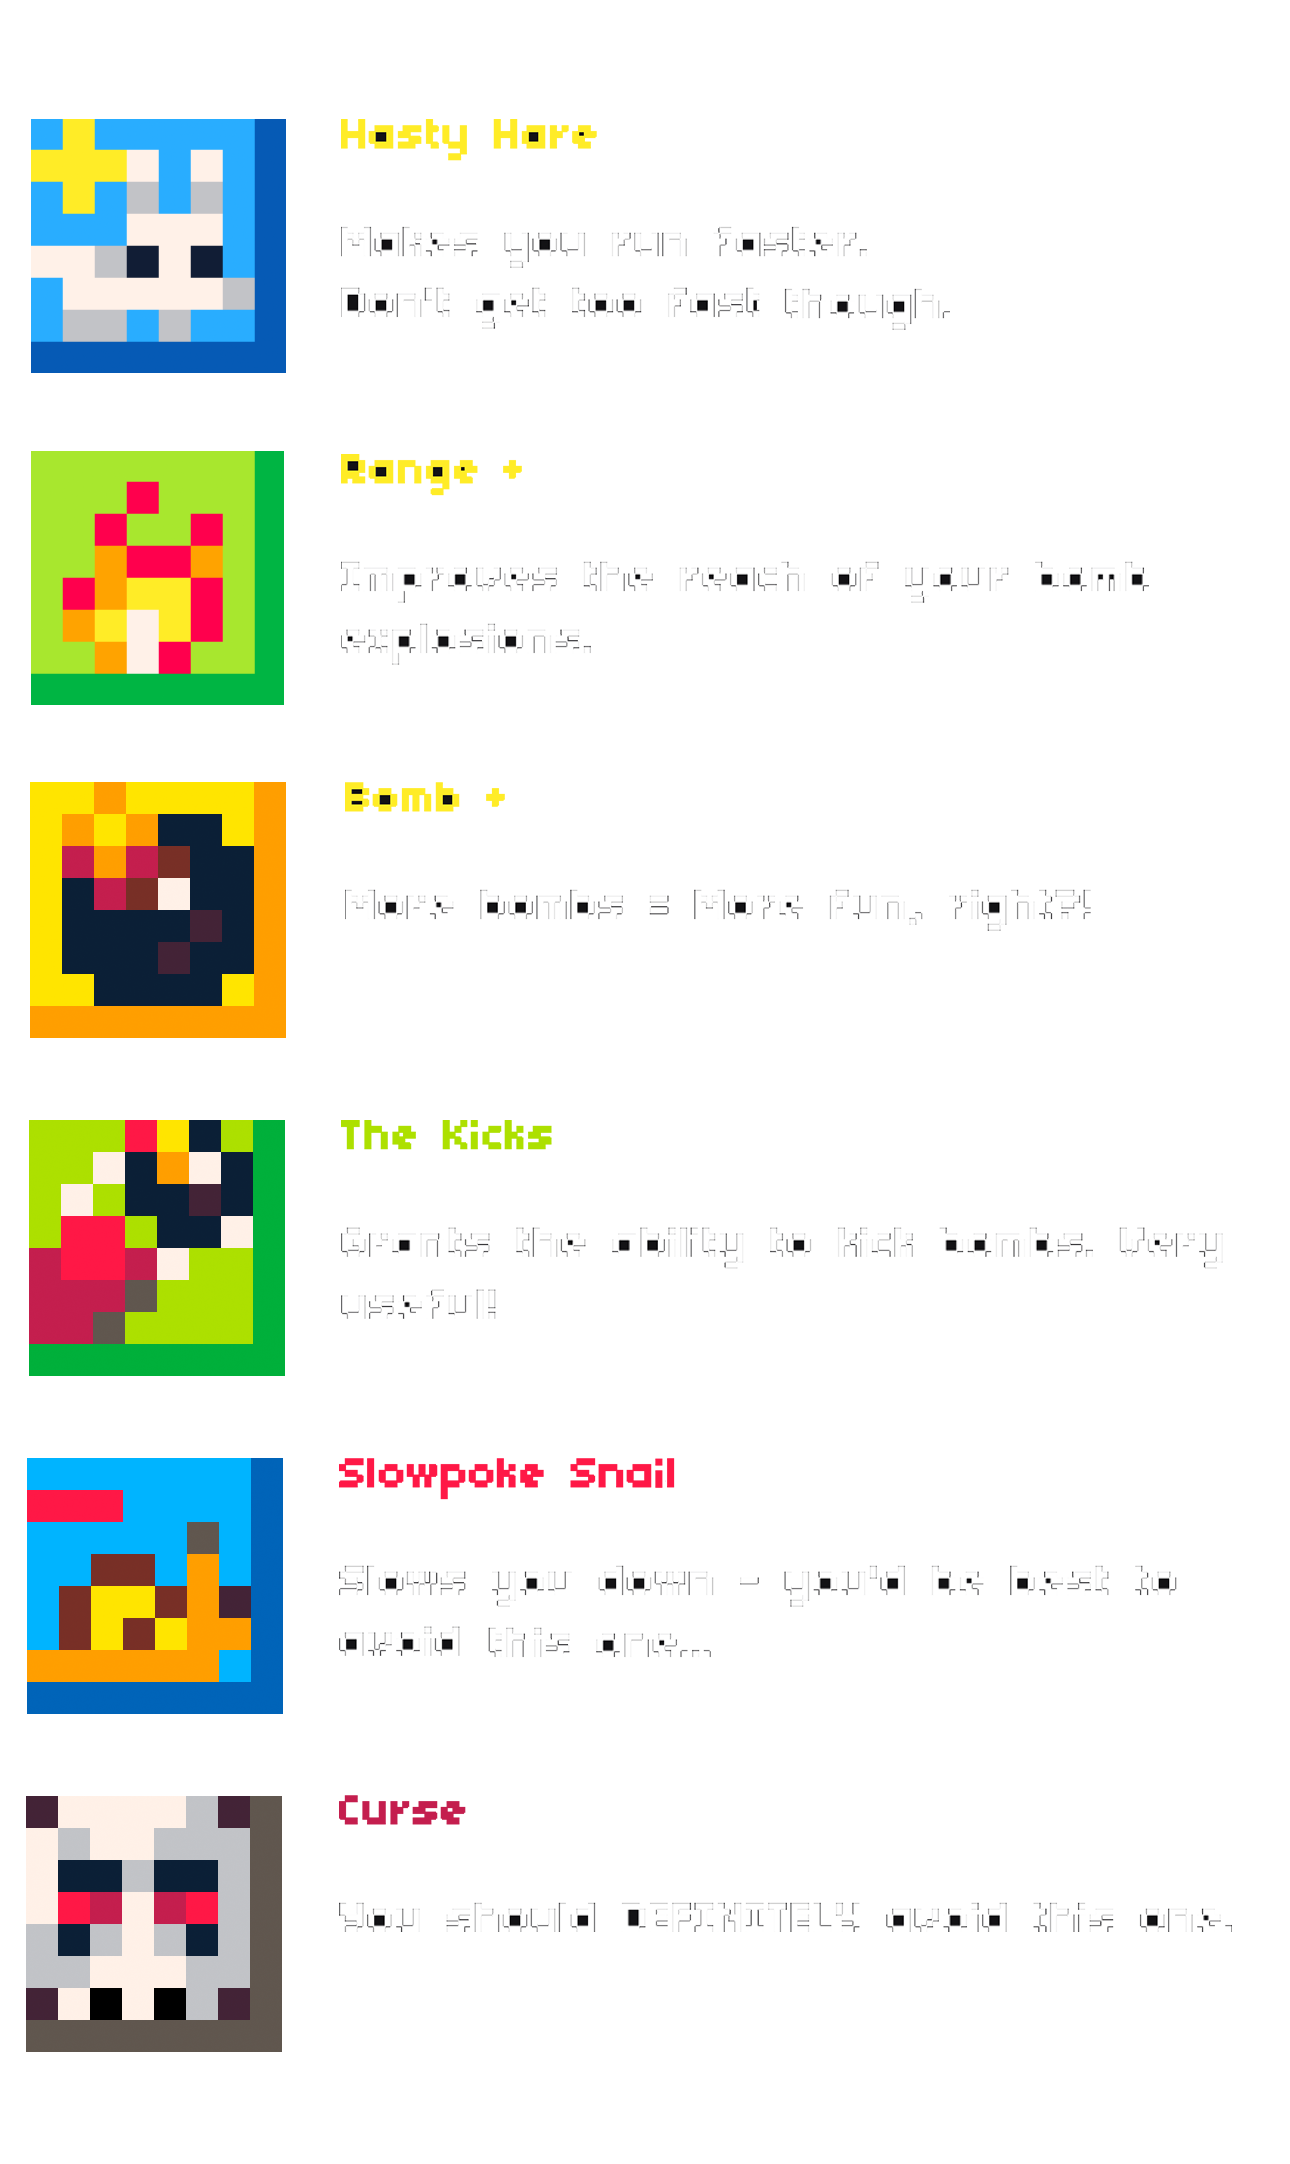
Items
While bombing your way through the battlefield, you will come across various items which may help (or hinder) you along the way:
Credits
Art & Music: Max Pellegrino (maaax)
Programming & Sound: Dominik Leiser (Fresh-D)
Website: Play on itch.io

Calling this in editor:
mkdir(nil) |
will crash the editor instantly.
Opening pico8 in terminal, or running a script in headless mode containing this line (pico8 -x script.p8), allows us to see:
Segmentation fault (core dumped)
Interestingly, mkdir() (no argument at all) just shows the help, like mkdir without brackets at all.
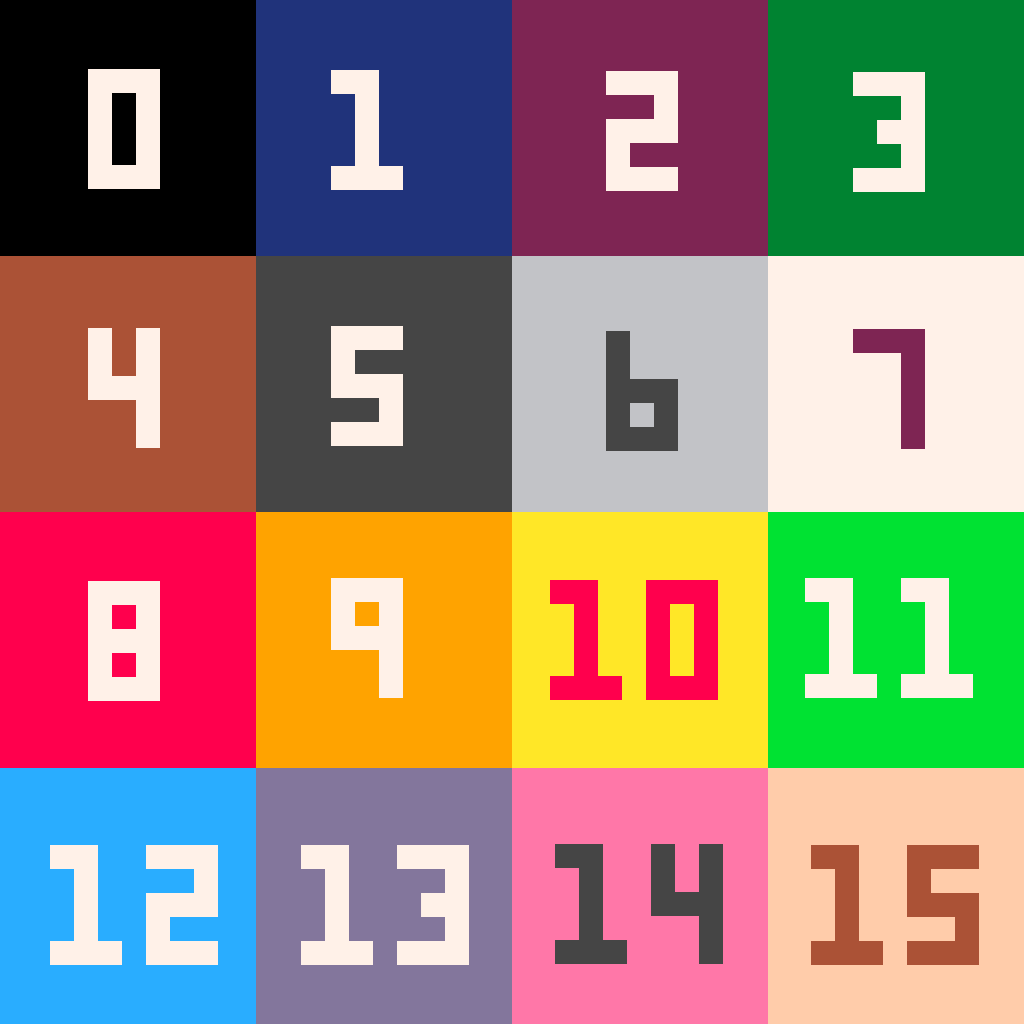
I noticed that the screenshot captures done with F1 from the editor contain a black color #020408, while a system screenshot will show that PICO-8 uses #000000 while running.
This caused some issues as I was editing screen captures, Aseprite noticed that the color didn't match the black color from the PICO-8 palette, and operations like color replacement failed.
This may have been the case from the start, and I have no idea how many times I used screenshots in my editing process, possibly mixing "good" and "bad" black together. As they are not distinguishable with bare eyes this may be a problem for later (e.g. I try to fill an area with color bucket but it only colors a small area).
I could only find one occurrence of this color, on the PICO-8 Wikipedia talk: https://en.wikipedia.org/wiki/Talk:Pico-8
Apparently the old page was mentioning #020408 for black. Either it was the old color, or the author checked the colors from an F1 screenshot (and I would have done the same!).
I don't know if other colors are different during screenshot.
I don't know if it's intentional for web export, human eye convenience or anything, or if it's just an old value that was not updated.

PICONICCC — demo for PICO-8.
Released at DiHalt 2021 demoparty (https://events.retroscene.org/dh2021)
Creating ST NICCC clones on all possible platforms is a demoscene challenge. The original demo uses a 640KB data file. A single PICO-8 cartridge can fit only about 12KB of arbitrary data. To fit the whole 3D scene in a single cartridge, we re-created it with 3D models. In my opinion, finding clever solutions to overcome platform limitations and do what seemed to be impossible to do is the essence of the old-school demoscene.
Credits:
Code: Megus
3D models: TmK/deMarche
Music: n1k-o/Stardust
Graphics: Diver/Stardust
Source code and tools: https://github.com/Megus/piconiccc

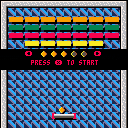
Hey, this is a very simple arkanoid remake.
Some of the collision detection and the text animations are from the known breakout tutorial.
It has 6 levels and 3 balls per game.
No points, just bricks and new levels.
Specify the difficulty at start, 5 is for the pros ;)

Hello, this is my first Pico-8 game! It's based off the great intro tutorial by Dylan Bennett, but I took it in a different direction. Your goal is simply to mine out all the nuggets and get as many as possible! Enjoy (also it's probably really hard, I could use some advice on difficulty!)
I love pico-8 and can't wait to do more stuff with it!


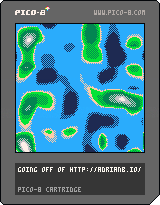
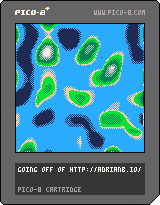
Going off of http://adrianb.io/2014/08/09/perlinnoise.html
I created a Perlin noise generator from scratch. Then I assigned the value range to some colors + lattices to simulate an archipelago!
Reload to get a new one. Download + press Z to save a particularly cute set of vectors that generate that island (will save under proc_map_vectors.json.p8l)
Pretty proud of how this turned out. I didn't port the code, per se, rather I wrote it from 0 with just the algorithm logic. Hope it's educational!

UPDATE: Use X to generate a new set of islands without having to reload the page

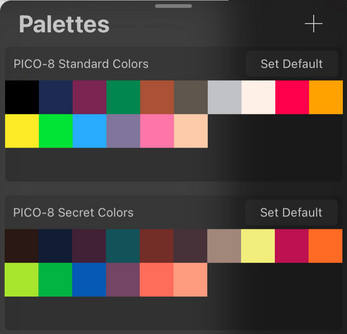
Want to take advantage of the iPad app Procreate to help design better graphics for your next game in PICO-8... Check out my FREE "Procreate PICO-8 Pack" now available on Itch.io.
The following is included:
- 🖌️ A pixel-perfect brush
- 🎨 Two PICO-8 color palettes
- The standard colors
- The secret colors
- 📄 A PICO-8 Canvas
- 128px x 128px @ 72dpi
Enjoy and I hope it helps make even greater games for this fun to code fantasy console!
Corewar is played between two programs written in Redcode, a low-level language similar to assembly.
Players write a program to eliminate all opponents in the memory (core) of the virtual computer.
The "sandbox" goal of Corewar is to write code that will cause your opponent code to terminate.
A set of challenges with incremental difficulty (like in all Zachlikes) is yet to be created.
This game is part of the Zachlike Jam and currently work in progress.
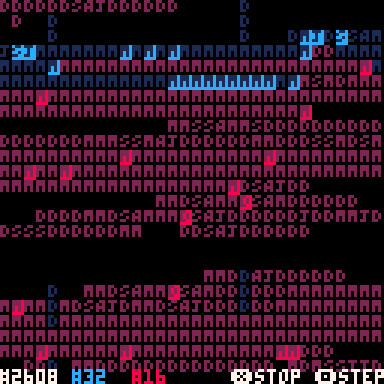
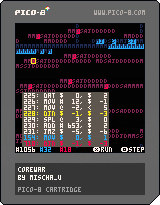
The above screen with the dancing letters shows a 800 cell memory (core), with 1 instruction per memory
location. The letters represent the first character of the opcode stored in that memory location
(so D=DAT, M=MOV, J=JMP, etc). The blue/red color shows who "owns" (has written) that memory cell and
the highlights show the instructions pointers for all the processes of that color.
Example warrior code
This program will overwrite every 4th memory position with a DAT instruction, potentially corrupting
& killing the other process:
0000: ADD # 4, $ 3 0001: MOV $ 2, @ 2 0002: JMP $ -2, # 0 0003: DAT # 0, # 0 |
Learning Redcode
Read the beginners' guide to Redcode for a thorough
introduction to the Corewar language. Further below you will find an overview of the supported
opcodes and address modes in this version of Corewar.
User Interface
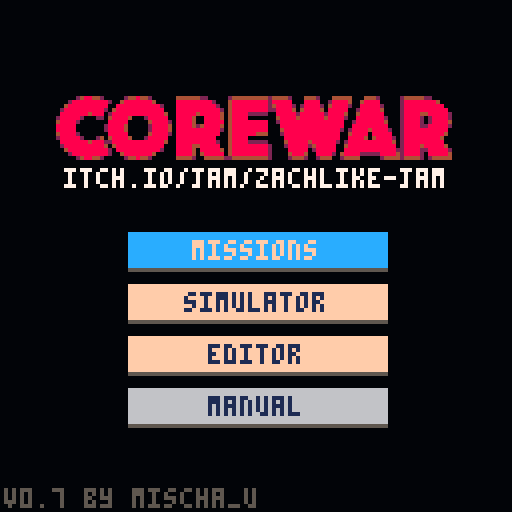
main menu screenshot
When running the cartridge, you enter in the main menu with the following options:
- Missions - Complete a list of challenges (work in progress)
- Simulator - run a fight between two warriors
- Editor - write the code for a warrior
- Manual - In-game details on the instructions.
Missions
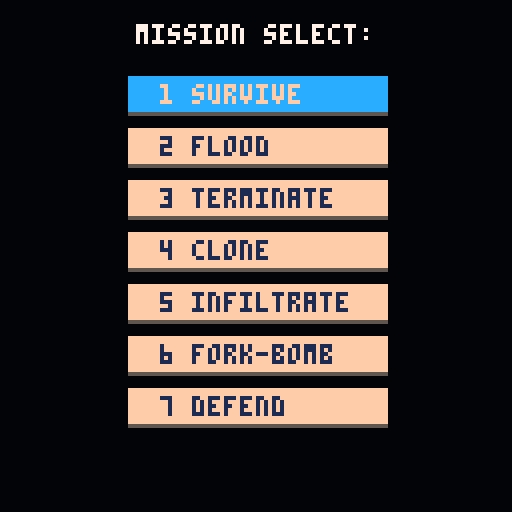
mission select screenshot
Select one of the available missions, they are in more-or-less increasing difficulty and challenge you to explore the Corewar system.
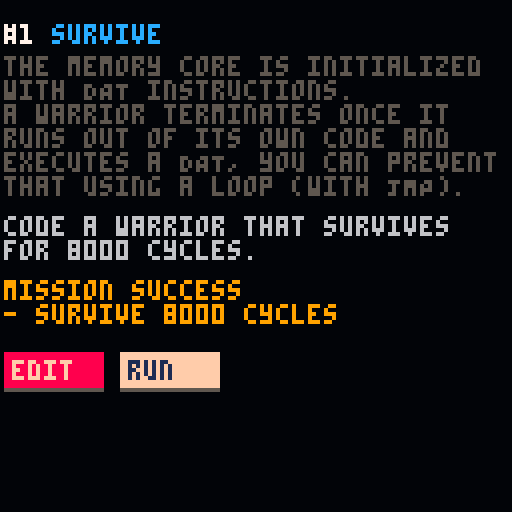
mission details screenshot
For each mission a short introduction is given, followed by the core objective and a list of goals that need to be completed in order for the mission to succeed. From here you can create/edit the warrior solution
using the in-game editor (see below for details on the editor). Once you have created your solution,
you can run it in the Simulator and test it against the mission objectives (see the next section for more
on the Simulator).
Simulator
warrior selector screenshot
Select which two warriors (blue and red) will fight against each other. You can also have a warrior
fight a copy of itself.

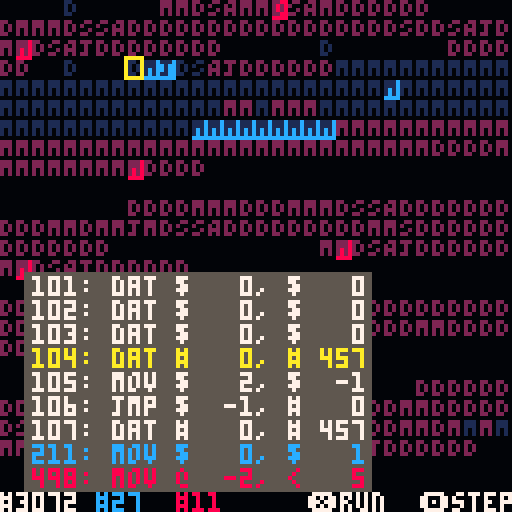
simulator intro screenshot
The warriors are loaded into the core at equal distance (but with a random offset).
The default coresize is 800 cells and will run for 8000 cycles. On the bottom row you can see the
current cycle (white #0), the number of blue processes (#1) and the number of red processes (#1).
When a warrior doesn't have any processes anymore (#0) it loses, if both warriors are still running
after 8000 cycles the game is a tie.
The characters M,J,D,S,A, etc are the first characters of the opcode in the memory, giving you an
idea for the "fingerprint" of the each warrior. The highlighted character is the current active
instruction from the process queue.
Press ❎ to run / pause the simulation. Press 🅾️ to step through it one cycle at a time. When
the simulation is paused, you can inspect the memory by moving the debug cursor (yellow square)
with the arrow keys.
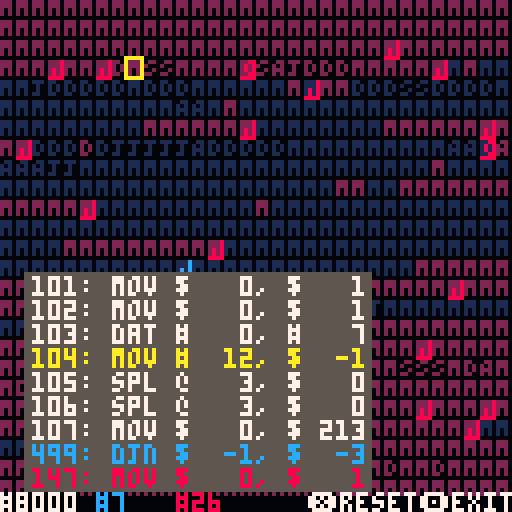
simulator pause screenshot
When paused, you can see the memory around the debug cursor (yellow highlighted). The blue and
red active instructions are also shown.
simulator pause screenshot
After running for a while, you can see that both warriors have spawned multiple processes and
filled the core with their data / instructions.
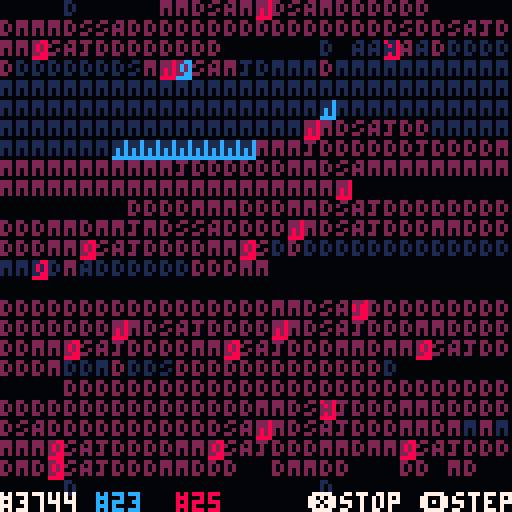
simulator run screenshot
Running ❎ the simulation at full speed.
simulator end screenshot
The simulation has ended at 8000 cycles, both warriors are still alive (blue with 7 processes and red
with 26), resulting in a draw. You can restart ❎ the simulation of go back 🅾️ to the main menu.
If you want to exit the simulation before it has ended, press both the ❎ and 🅾️ buttons at the
same time while paused.

simulator mission result screenshot
If you are running the simulator for a mission solution, you will see if you succeeded to complete the objective of the mission. Any completed or failed goals are listed, allowing you to understand what went wrong.
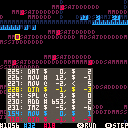
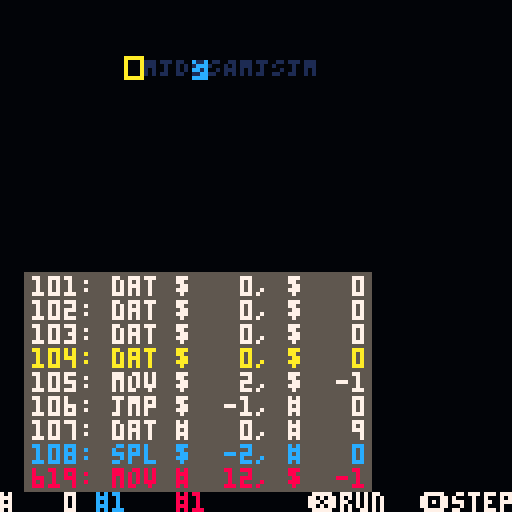
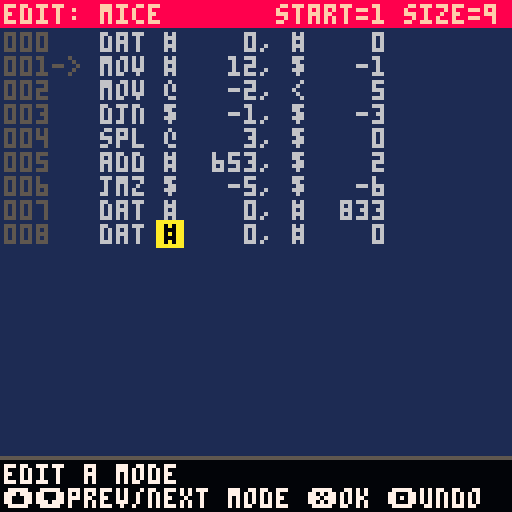
Editor
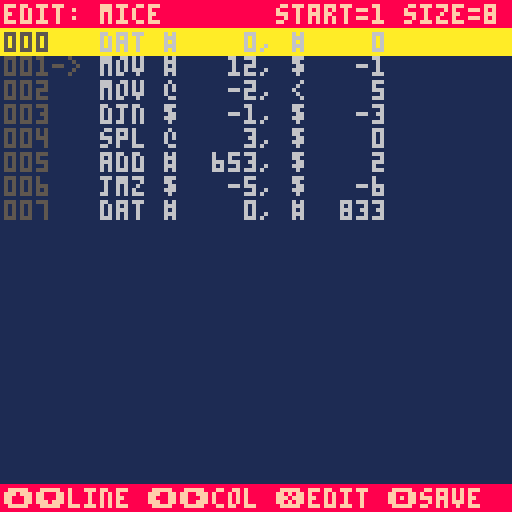
editor screenshot
After starting the editor, you can see and change the instructions for the current warrior. Editing
is done with the 6 PICO-8 buttons; the 4 arrow keys and the ❎ and 🅾️ buttons. Within the scope of
the editor, the ❎ button is commonly used to edit / confirm and the 🅾️ button for undo / save &
back to the main menu.
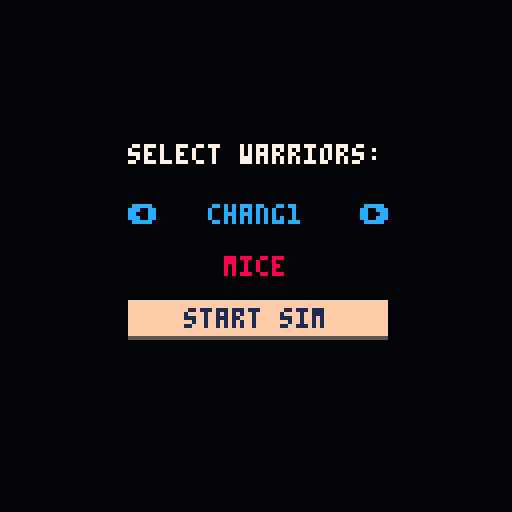
At the top of the screen you can see the name of the current warrior (MICE), the starting position
(also indicated by the -> arrow at line 001) and the size (8) of the code.
The first column are the line numbers (000), followed by the instruction / opcode (DAT), the
A-address modifier (#), the A number (0), the B-address modifier (#) and the B address (0).
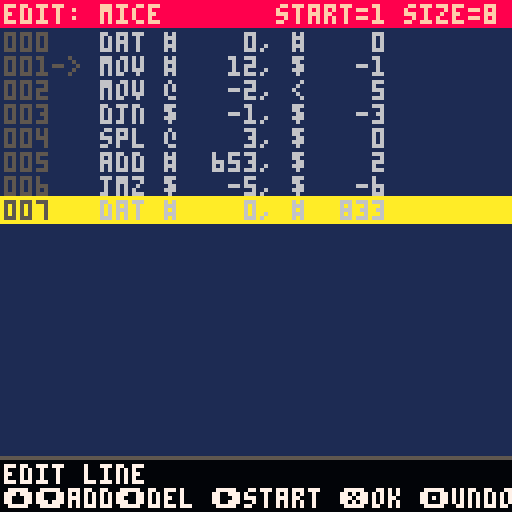
edit line screenshot
Use the up/down buttons to change the current line, you can enter the line edit mode by pressing
the ❎ button, which lets you add a new line above/below (up/down) the current line, delete the
current line (left) and set the start position (right) to the current line. You can make multiple
changes while you are in the edit line mode. Press ❎ to confirm the changes or press 🅾️ to undo.
Use the left/right buttons to select a column on the current line, you can then edit the column
value by pressing the ❎ button.
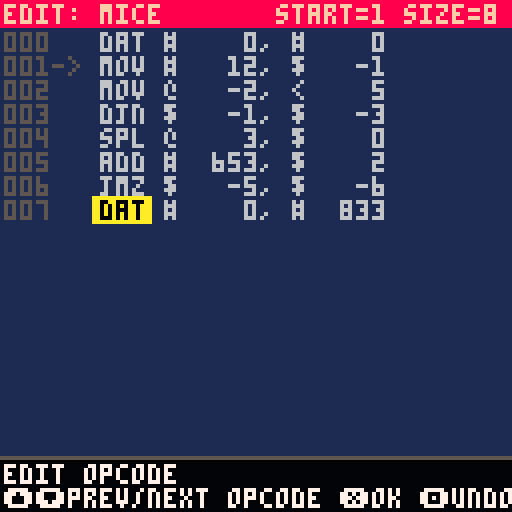
edit opcode screenshot
When editing the opcode, you can cycle through the opcodes with the up/down button.
Press ❎ to confirm the change or press 🅾️ to undo.
edit address mode screenshot
When editing the opcode, you can cycle through the opcodes with the up/down button.
Press ❎ to confirm the change or press 🅾️ to undo.
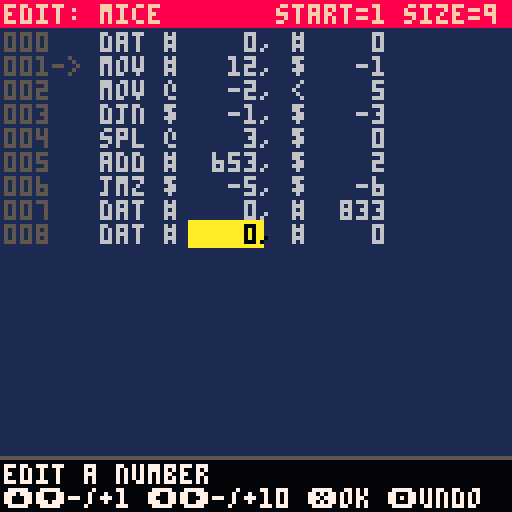
edit number screenshot
When editing the A or B number, you can change the number in steps of 1 with the up/down buttons
and in steps of 10 with the left/right buttons. Press ❎ to confirm the change or press 🅾️ to undo.
Redcode
This version of Corewar attempts to follow the Redcode ICWS '94 standard,
with the following limitations for the sake of simplicity and PICO-8 limitations:
- only modes #$@<
- no opcode modifiers (using ICWS'88 defaults)
- no expressions
- no macros
- no ORG, EQU or END pseudo-instructions
- no comments
Redcode instruction set
Each location in memory contains an instruction and two values A and B. A and B are used as address
pointers when the instruction is executed. A and B may also be used as data when referenced by
another instruction.
Opcodes can be divided into six groups:
Data:
DAT - stores data, the process executing DAT is terminated
Copying:
MOV - copy the contents of A to B
Simple Maths:
ADD - add the contents of A to the contents of B
SUB - subtract the contents of A from the contents of B
MUL - multiply the contents of A by the contents of B
DIV - divide the contents of B by the contents of A
MOD - divide the contents of B by the contents of A, taking the remainder
Flow Control:
JMP - transfer control to A (the contents of B is ignored)
JMZ - transfer control to A if the contents of B are zero
JMN - transfer control to A if the contents of B are non-zero
DJN - decrement the contents of B then transfer control to A if non-zero
SEQ - skip the next instruction if the contents of A and B are equal
SNE - skip the next instruction if the contents of A and B are not equal
SLT - skip the next instruction if the contents of A is less than B
Process Control:
SPL - create a new process at A (the contents of B is ignored)
Miscellaneous:
NOP - do nothing (for debugging purposes)
Addresses
Each address has an addressing mode and a pointer. All pointers are relative to where the address
is stored. 0 refers to the current location. 1 refers to the next location and -1 to the previous.
There are 4 addressing modes:
$ - direct - address is the location at pointer
# - immediate - address is the current instruction
@ - B indirect - the B value of the location at pointer points to the address
< - pre decrement B indirect - decrement the B value of the location at pointer then use B indirect
addressing
All values are taken modulo the size of memory (CORESIZE). Values range from 0 to CORESIZE-1. For
example if the CORESIZE is 800, -3 is stored as 797 (CORESIZE-3).
Hi All,
I wrote a small function to scale 8x8 sprites using a sprite number instead of using sspr() itself and having to pick out the x and y position each time.
I'm using it for the Toy Box Jam 2 where you have a spritesheet already made and you want to quickly resize things.
Updated function with feedback from @freds72 and @MBoffin:
function xspr(sprt,x,y,w,h)
    --sprt: sprite number
    --x: x position
    --y: y position
    --w: new sprite width
    --h: new sprite height
    local sx=(sprt%16)*8
    local sy=sprt\16*8
    sspr(sx,sy,8,8,x,y,w,h)
end |
Original function:
Probably already exists someplace but thought I'd share my own solution to the problem.
Cheers

I use an external editor when working with P8. Due to years of programming experience with CamelCase, I have written all my code in that format, accepting that it won't look right in the P8 editor. Everything has been working fine for me.
I discovered today, though, that there's no mechanism for me to inspect values at runtime, since I can't type "puny" (uppercase) letters into the Esc command line. Thus I can't do
print(myVariable)
I tried copying from my external editor, typing in all standard-case, or pressing Ctrl-P. None of these helped.


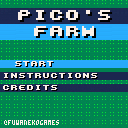
A game made in roughly 3 days for the ToyBoxJam 2020! Plant some crops and stay out of debt. See how many days you can last.
This doesn't quite have all the stuff that I wanted to put in it, but now that the deadline is extended I'll probably keep playing with the concept :)
It definitely needs a good chunk of optimization, but I still think it's a fun little toy.