


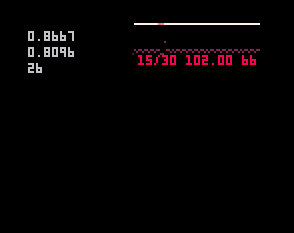
I get occasional crashes when using the new feature to remap the spritesheet to the extended memory. Can't reproduce reliably. But documented in this video at 15:38. No error message. Just a clean crash to the desktop. Using Windows 11 Pro.
 0 comments
In version 0.2.6B merge_joysticks 2 doesn't work as described.
Expected behavior: Gamepad 0 and 1 would control one player (P0)
Actual behavior: Gamepad 0 controls two players (P0 and P1)
Documented in this video at timecode 32:11
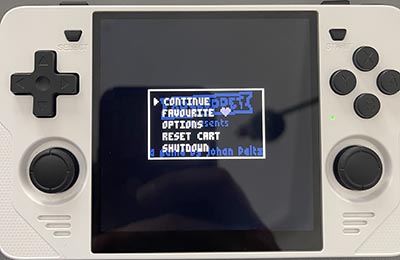
I would like to request a more consistent availability of the "SHUTDOWN" menu command for handheld devices. Currently, when running Pico-8 on a handheld device (Powkiddy RGB30, Anbernic 351v, etc..) it can be difficult to shut down Pico-8. Every device has button shortcuts to force quit an App but they often won't work in Pico-8 depending on the OS and Handheld. In these cases using the "SHUTDOWN" command in the START menu is the only way to return to the OS. When launching directly into a cart, there is always a Shutdown command in the START menu
In my opinion, this is the desired behaviour.
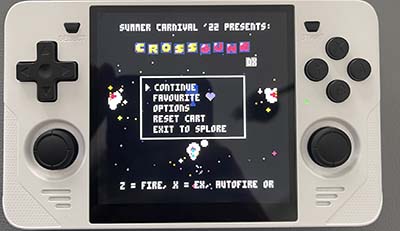
However, when Pico-8 launches Splore mode, that menu does NOT have the "SHUTDOWN" command. It is replaced by "EXIT TO SPLORE"
From Splore it is possible to get to a Shutdown but that is hidden and sometimes not easy to access. You need to actually select a cart and press START, then select "OPTIONS"
Which will then bring up a second menu where you can actually shut down Pico-8
This is pretty cumbersome. Especially it seems like the Powkiddy RGB30 seem to have a double-trigger issue on the START button making hard to enter that cart menu in Splore without immediately launching the cart as well.
EDIT: I realized I had confused START and ESC. I edited the post. There is also an ESC menu and that works well for the purpose I'm describing here. It usually has a shutdown option. The problem I have is that many handhelds don't have a button that can be mapped to ESC so it would be good if the START menu always included a quick shutdown
I would like to request more robust features to be able to control which controllers are assigned to which player. The current solution causes problems when using the Powkiddy RGB30 in TV console mode.
Background: The Powkiddy RGB30 has an HDMI out allowing it to attach to the TV like a Nintendo switch.
In this mode it makes sense to attach an external Controller to the handheld to be able to play the game at a comfortable distance - ideally using a wireless USB dongle or a Bluetooth controller.
However, the way Pico-8 currently handles controller assignment makes this cumbersome or impossible. On the RGB30 the face buttons on the device are mapped as a controller. That controller is usually controller #0. Attaching an external controller results as that controller being #1. Pico-8 will map that second controller to player 2. This makes it impossible to play most games and it also makes it impossible to control the menu with the external controller.
I tried the -joystick command line parameter to fix this but I couldn't find a value that would make Pico-8 map controller #1 to player 1. -joystick 7 will not work. Apparently the player values don't cycle over. -joystick -1 won't work either. Apparently negative player numbers are invalid.
I did find a workaround - booting the console with the controller attached will map the external controller as #0 and it will work correctly. However, this workaround won't work for Bluetooth controllers and a more robust solution would be desirable.
Perhaps a quick fix would be to implement a command line parameter allowing to hard-bind EVERY controller to Player 1?
Or perhaps I am missing some vital feature?
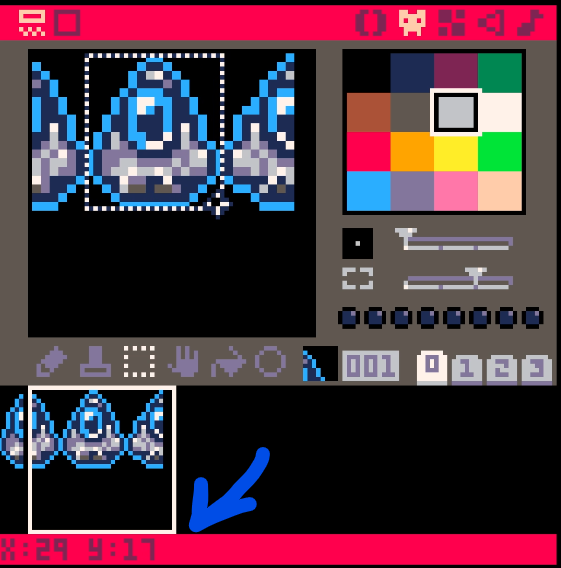
When you move the mouse cursor in the Sprite Editor the status bar at the bottom shows the X and Y coordinate in the spritesheet. It would be a help if this also showed the Width and Height of a selection if you have something selected. I often want to measure the size of things in the sprite sheet and the selection tool is usually the way to do it in other programs.
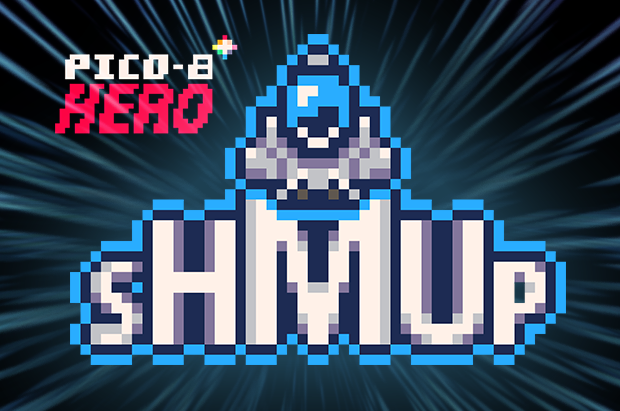
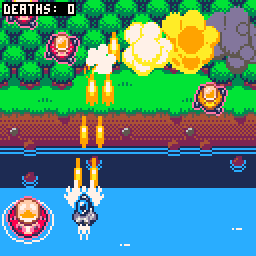
I'm starting a tutorial on how to make your a BETTER Shmup in Pico-8! It's for complete beginners. It is a series specifically designed for more experienced developers looking to enhance their skills. It is a follow up to the Basic Shmup Tutorial we did earlier last year.
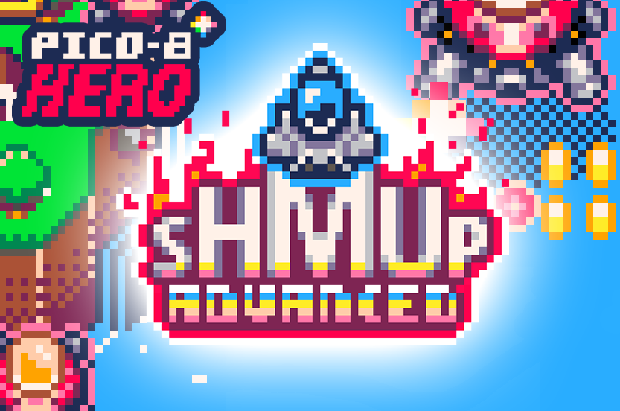
We will take everything we've learned in the basic tutorial and turn it up to 11. We will cover things like project planning, token optimization and tool development. The goal will be to make a PROPER Shmup with a rich scrolling background, dynamically spawning enemies and complex bullet patterns.

New episodes on Wednesdays and Saturdays. I will use this thread to keep a list of the episodes and post significant progress. Let's gooooo!
Episode 2 - Performance
Episode 3 - Scrolling
Episode 4 - Modular Scrolling
Episode 5 - Movement
Episode 6 - Smooth Movement
Episode 7 - Banking
Episode 8 - Shooting
Episode 9 - Better Shooting
Episode 10 - Explosions
Episode 11 - Dithering
Episode 12 - Blob Grapes
Episode 13 - Blob Animation
Episode 14 - Blob Color
Episode 15 - Sparks
Episode 16 - Side-Scrolling
Episode 17 - Tilemap Design
Episode 18 - First Prototype
Episode 19 - State Machine
Episode 20 - Sprite System
Episode 21 - Symmetry
Episode 22 - Split 2D
Episode 23 - Enemies
Episode 24 - Bullets
Episode 25 - Collisions
Episode 26 - Splash
Episode 27 - Custom Tools
Episode 28 - Table Export
Episode 29 - Tool UI
Episode 30 - Keyboard
Episode 31 - Adding Data
Episode 32 - Sprite Editor
Episode 33 - Sprite UI
Episode 34 - Robustness
Episode 35 - The Wall
Episode 36 - Animation System
Episode 37 - Enemy Database
Episode 38 - Collision System
Episode 39 - Hitbox Editor
Episode 40 - Death
Episode 41 - Spawn Schedule
Episode 42 - Schedule Editor
Episode 43 - Schedule Preview
Episode 44 - Timeline
Episode 45 - Mouse UI
Episode 46 - Clicking Enemies
Episode 47 - Dropdown
Episode 48 - Enemy Behavior
Episode 49 - Making Brains
Episode 50 - Brain Editor
Episode 51 - Brain Preview
Episode 52 - Brain Metadata
Episode 53 - Simple Attacks
Episode 54 - Brain Goto
Episode 55 - Enemy Turnaround
Episode 56 - Enemy Snake
Episode 57 - Enemy Follow
Episode 58 - Boss Brain
Episode 59 - Bullet Patterns
Currently doing some prep work for a video. Went through the changelog and I wanted to report two issues.
- I noticed this change in v0.2.4c
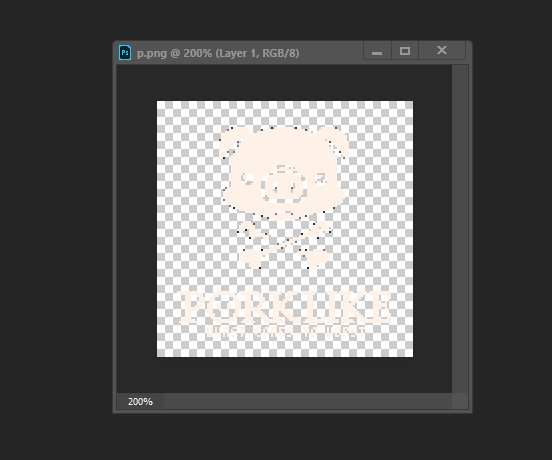
Fixed: exported label alpha is 0 for colour 0 |
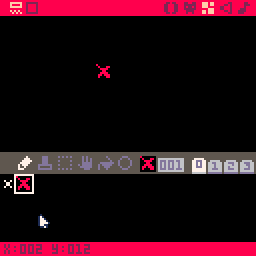
Seems like this bug persists. This is what the Porklike cart image looks like exported with v0.2.5e
- It is possible to export a cart image that features "secret" colors. However, this doesn't work in reverse. If you re-import that very same file the "secret" colors revert to the default palette. Would love for this function to support the full color range.
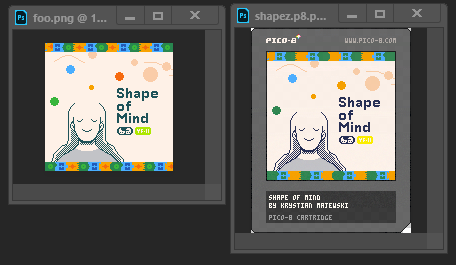
left: Shape of Mind cart image exported in v0.2.5e
right: what the p8.png looks like if you re-import that same image
Obviously, not a high-priory issue. But might be worth looking into at the next convenient opportunity.


Arrow keys - Move cursor
(X) - Confirm, pick up pieces, drop pieces
(O) - Cancel
Enter - Menu
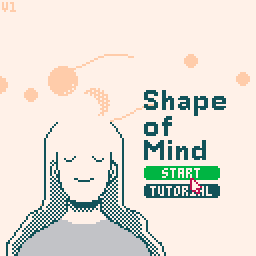
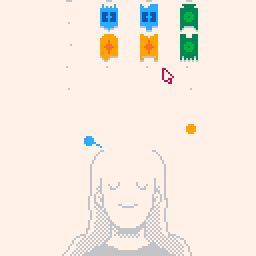
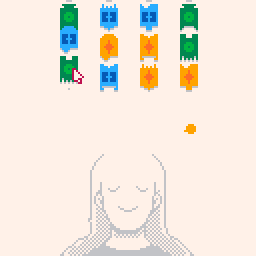
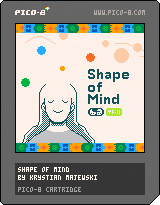
Shape of Mind is a simple puzzle game similar to Solitaire card games. Connect shapes by dragging them on the board. Shapes of the same color won't connect. You can move strips of connected shapes by grabbing the top-most shape of a strip. Drop shapes onto the Dreamer to begin a Halo. Shapes in the Halo cannot be removed. Once a Halo is complete the shapes will disappear. Complete three Halos to clear all the shapes and win the game!
About
This game was created as part of the A Game By Its Cover Jam 2022. The goal was to create a game based on of the cartridge covers from the Famicase Exhibition 2022. The cover to Shape of Mind was created by Agustin Crisostomo.
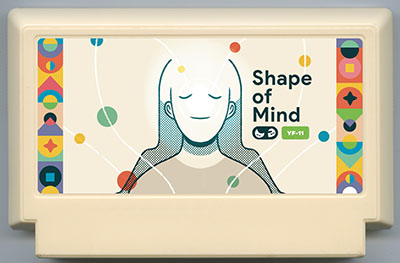
The game was written and designed by Krystian Majewski, an Independent Developer and the host of the Lazy Devs Academy video channel. The entire development process was livestreamed.
The music was composed by Gruber Music.
The game is written entirely in Pico-8.
Change Log
V2
Small fixes
- Fixed a bug where it was possible early in the tutorial to access the Dreamer using the keyboard
- Fixed a bug where Undo was showing up early in the tutorial
V2B
Small fixes
- Fixed a small bug where the game would be stuck on the same seed
- Selecting the seed from the menu will copy the seed into the clipboard
|
187 
|
How to Play
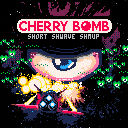
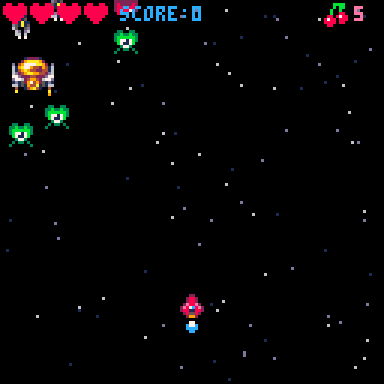
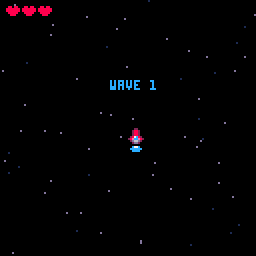
Cherry Bomb is a basic arcade Shoot 'em up game (Shmup) reminiscent of Space Invaders or Galaga. Pilot your red spaceship to blast your way through 9 waves of attacking aliens. Use the following controls:
- Arrow keys - Move the ship
- (X) - Shoot
- (O) - Bomb (Depletes your 🍒. See below)
Shoot the enemies to destroy them. Enemies will attack you. Destroy or avoid all enemies in a wave to proceed to the next wave. There are 9 waves in the game. If you get hit you will lose a ❤️. If you lose all ❤️ you lose the game.
Pickups
Occasionally, defeated enemies will drop a 🍒 pickup. Collect them to increase the strength of your Bomb. Triggering the Bomb will deplete your 🍒. You cannot use the Bomb if you have no 🍒.
If you collect 10 🍒 you will restore a ❤️. If you already have 4❤️ you will get points instead. After collecting 10 🍒 your stock will always reset.
Scoring
Here are ways to score in the game:
- Shooting down enemies will give you points. More dangerous enemies will give more points
- Shooting down an attacking enemy will double the points you get
- Collecting 10🍒 with 4❤️ will give you points
- Destroying enemy bullets with the Bomb will give you points
The game will keep your highest score. Post your best results in the comments below!
Learn How to Make This Game!
Cherry Bomb was created as part of a tutorial series about how to make your own game from scratch. If you also want to make a game like this check out this thread!
Credits
This game was written and designed by Krystian Majewski, an Independent Developer and the host of the Lazy Devs Academy video channel.
The music was composed by Sebastian Haßler, a music composer for film, TV and videogames.
I'm starting a tutorial on how to make your a Shmup in Pico-8 from scratch! It's for complete beginners.
The goal is to make a basic Shmup first and then slowly turn it into an AWESOME shmup!
New episodes on Wednesdays and Saturdays. I will use this thread to keep a list of the episodes and post significant progress. Let's gooooo!
Episode 2 - Moving Stuff
Episode 3 - Controls
Episode 4 - Shooting
Episode 5 - Animation
Episode 6 - Health UI
Episode 7 - Starfield
Episode 8 - Animating Stars
Episode 9 - Game Over
Episode 10 - More Bullets
Episode 11 - Enemies
Episode 12 - Collsions
Episode 13 - Invulnerability
Episode 14 - Explosions
Episode 15 - Better Explosions
Episode 16 - Shockwaves
Episode 17 - Music
Episode 18 - More Enemies
Episode 19 - Big Enemies
Episode 20 - Enemy Spawns
Episode 21 - Enemy Movement
Episode 22 - Enemy Attacks
Episode 23 - Enemy Bullets
Episode 24 - Spread Shots
Episode 25 - Aimed Shots
Episode 26 - Pickups
Episode 27 - Bombs
Episode 28 - Boss
Episode 29 - The End
Also annoucing the Lazy Devs Basic Shmup Showcase. If you participated in the tutorial you have one month to finish your game and submit it to the showcase. I pledge to play all of the submitted game and to discuss them in a dedicated video!

UPDATE: Continued in the Advanced Shmup Tutorial
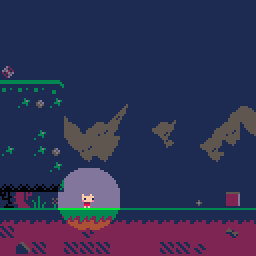
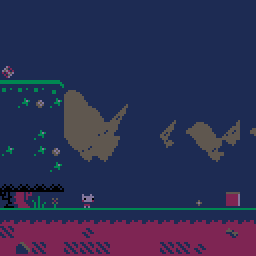
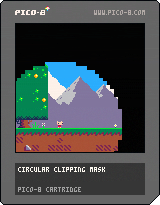
Circular Clipping Masks
I wanted to create a comprehensive post on how to create Circular Clipping Masks. This post goes together with a video tutorial I made which you can watch here:
But if the video doesn't work or you don't want to watch a long video, I want this post to make sense without it.
What is it and why do I need it?
Pico-8 has this function called CLIP(). It restricts all drawing to a rectangular area on the screen. A Circular Clipping Mask is that but instead of a square area it's a circular area. The simplest version of this function is drawing the game inside a screen and making everything around it black.
There are many names for this effect. I call this a "Circular Clipping Mask" in this thread. But possible names could be also "Iris Out", "Circular Stencil", "Circular Matte", "Inverted Circle Fill", etc...
One typical application of such function is a cartoony screen transition at the end of a level like in Super Mario World. Another application is making a "dark level". You only render the environment around the player's character in order to simulate an environment with low visibility.

But this sort of functionality can go a long way. Some games hinge their entire game mechanic around it, like in case of independent titles like Closure or Schein.

Many devs find themselves in situations where they want a Circular Clipping Mask but Pico-8 doesn't provide straight-forward tools to make one. So in this post I want to discuss 4 different techniques to pull of this effect. I also want to invite you to post your own solution so we can build a repository of tools to tackle this recurring problem.
Workbench
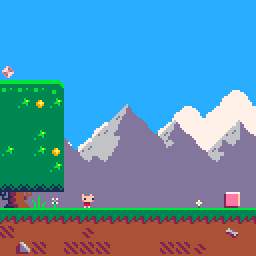
I want to show off code in a practical application scenario. So I decided to mod Jelpi's code to allow us to try out different approaches and to compare the results. Here is the workbench cart I will be using for this post. You can just download this or create your own:
NOTE In the cart above all the Circular Mask code is in tab 1 for your convenience. This is a small change from the video. I hope this won't lead to any confusion.
Changes I've made
- Created a BEFOREDRAW() function and inserted it in the _DRAW() function just before the comment "-- decide which side to draw"
- Created a AFTERDRAW() function and inserted it in the _DRAW() function at the very end
- Commented out the CLIP() statement from the DRAW_WORLD() function so it doesn't interfere with my own clipping mask
- Inside the _DRAW() function, just before the BEFOREDRAW() call, I fill the screen with pink hearts. This effect is triggered by setting the global variable DRAWMYBG to TRUE. This is something I want to use later to optionally test our ability to combine two unrelated scenes. The hearts themselves don't matter, could be any visually distinct effect.
- Inside the BEFOREDRAW() function I calculate Jelpi's position on screen and save it in global variables
myx=pl[1].x*8-cam_x myy=pl[1].y*8-cam_y-4 |
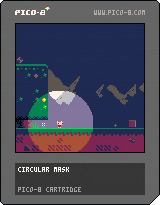
To test if this works I draw a 32 x 32 clipping rectangle around Jelpi using CLIP() in BEFOREDRAW(). I also draw a red circle in AFTERDRAW() that perfectly matches the clipping rectangle. Our goal is to find out ways how we can fill in the gaps between the circle and the square. Let's go!

Method 1: Big Dumb Sprite
This is the simplest solution for this problem. Just draw a big circle in the spritesheet and render it on top of the clipping rectangle to fill in the gaps. You need to set the black color to opaque using PALT(). You also need to pick some other color to become the transparent color so the center of the circle becomes see-trough. The result is something like this:

This is a small circle. You can make a bigger one but that will start eating into your spritesheet. So it pays off to make sure you're using the sprite efficiently. Instead of drawing the entire circle in one big sprite you can only create a quarter-circle sprite and draw it 4 times flipped vertically and horizontally.
This will give you more bang for your buck and you'll get a nice big circle.
But that circle is still relatively static. We can scale the size of the clipping rectangle and use SSPR() to make sure our sprites scale accordingly. This works fine but does result in some pixelation.

Your AFTERDRAW() function ends up looking like this. MYX and MYY are the coordinates of the center of the circle. MYR is the radius.
function afterdraw() palt(8,true) palt(0,false) sspr(80,16,16,16,myx-myr,myy-myr,myr,myr) sspr(80,16,16,16,myx,myy-myr,myr,myr,true) sspr(80,16,16,16,myx-myr,myy,myr,myr,false,true) sspr(80,16,16,16,myx,myy,myr,myr,true,true) palt() end |
And here is the cart for you to download
Pros
- Super simple. No crazy math or memory manipulation. If you know how to draw sprites in Pico-8 you can probably make this work.
- Not limited to circles. You can easily make any clipping mask shape you want!

Cons
- The scaling looks pixelated
- You end up using precious sprite sheet space
- It's not a REAL clipping mask. You can only turn the background into a solid color. You cannot seamlessly draw one image on top of another
Method 2: Bunch of Circles
In order to save precious sprite sheet space and make things look nice and smooth, how about we draw the circles procedurally? We can't use the CIRCFILL() function to fill the outside of the circle. But how about we draw a bunch of circles with CIRC() and increase the radius as we go? Well, this will get you something like this:

As you can see, this doesn't quite work. You get some ugly gaps between the circles. The algorithm that draws the circles doesn't create circles that neatly fit into each other. And you can't draw more circles in-between to fill in the gaps since the radius needs to be an integer number.
But you can fill the gaps by drawing more circles. Every time you draw a circle you just draw a second, identical circle shifted by one pixel in any direction. This results in a complete coverage.
Something you need to pay attention to is how many circles you draw. As the clipping rectangle gets bigger there are more pixels to cover.

So you need to increase the number of circles to do the job. Drawing around RADIUS/2 number of circles seems to be about right. The result is going to look like this:

Your AFTERDRAW() function ends up looking like this.
function afterdraw() palt(0,false) for i=0,flr(myr/2) do circ(myx,myy,myr+i,0) circ(myx-1,myy,myr+i,0) end palt() end |
And here is the cart for you to download
Pros
- Scales cleanly
- Uses no sprites
- Fairly simple
Cons
- Feels a bit janky. Drawing whole bunch of overlapping circles just to cover the gaps.
- Mask not perfectly circular. Ends up a bit egg-shaped.
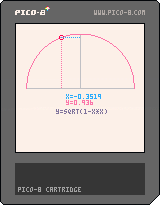
Method 3: Math!
Ok, time to put our big boy pants on. It's time for Math! This method is something that some devs would maybe consider "the proper way" of doing things. We are going to fill in the corners of the square by drawing the circle manually using a bunch of LINE() functions. We fill only in the areas we need line by line. However, in order to do that we need a mathematical function that tells us how to slice up a circle into individual lines. This sounds like it would use trigonometry but it's actually fairly simple. The following GIF / Cart examplifies:
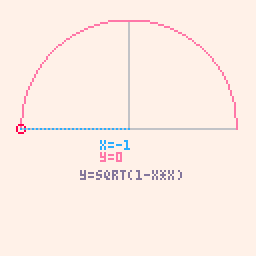
I explain the Math more in detail in the video. But in short, we draw a circle with the center at coordinate 0,0 with the radius of 1. By applying the Pythagoras Theorem we can plug in 1 as the length of the hypotenuse (c). We can then solve by a or b to derive a function that descirbes that kind of circle on a 2D grid. For any given X we can calulate the Y using this formula:
y = sqrt(1 - x*x) |
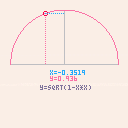
This equasion is going to be our "reference circle". All we need to do now is do a for loop that will iterate along one of the edges of the clipping rectangle and keep drawing lines into the rectangle. We need to translate the screen coordinates into a value between -1 and 1 to look up where on the reference circle any given line is. We will get a number between 0 and 1 as a return. This number needs to get multiplied with the radius to calculate how long each line has to be to form a nice circle. Here is what this looks like in "slow-mo".
Of course you then need to also draw a second line on the other side of the rectangle but that's just using the same result, no need to go through the calculations twice. This method requires quite a bit of fiddling with the math to get it to work. But when you get it to work you'll arrive at something like this:

Your AFTERDRAW() function ends up looking like this.
function afterdraw() palt(0,false) local py=myy-myr for px=myx-myr,myx+myr do local cval=px-(myx-myr) cval=cval/(myr*2) cval=cval*2-1 cval=1-sqrt(1-cval*cval) local ph=cval*myr+0.01 line(px,py,px,py+ph,0) line(px,py+myr*2-ph,px,py+myr*2,0) end palt() end |
And here is the cart for you to download
Fake Alpha with Method 3
The true power of Method 3 becomes apparent if we explore it's versatility. Since we are drawing everything manually we have access to some stunning effects. For instance, we can create an effect where the outside of the circle isn't just a solid black color but a dimmer version of the image - fake alpha transparency so to speak. To pull this off we are going to take advantages of the Video Remapping functionality in Pico 0.2.4.
Here is how the effect works. Instead of filling in just the corners of the clipping rectangle, we will fill the ENTIRE SCREEN with our black lines. And instead of black lines we are going to use SSPR to draw thin, line-shaped sprites. We will use Video Remapping to use the screen as the spritesheet. So we will redraw the entire screen line-by-line back onto itself, apply a palette change and leave a circular opening out. This is what the effect looks like (first in "slow-mo" and then in real-time):
This is a lot to take in but here is a commentated AFTERDRAW() function that hopefully steps you through the process
function afterdraw()
 --remap the spritesheet to the screen
 --spr+sspr statements will draw from the screen back onto the screen now
 poke(0x5f54,0x60)

 --palette shift everything a shade darker
 pal({0,1,1,2,0,5,5,2,
      5,13,3,1,1,2,13})

 --this calulates the top edge of the clipping rectangle
 local py=myy-myr

 --loop through the entire screen!
 for px=0,127 do

  --math that converts screen coordinates to a range compatible with our reference circle function
  local cval=px-(myx-myr)
  cval=cval/(myr*2)
  cval=cval*2-1

  --if we're outside the circle just draw the entire line
  if abs(cval)>1 and myr==0 then
   ssprline(px,0,px,128)
  else
   --the actual circle function
   cval=1-sqrt(1-cval*cval)

   --calculate length of the line
   local ph=cval*myr

   --draw both lines
   ssprline(px,0,px,py+ph)
   ssprline(px,py+myr*2-ph,px,129)
  end
 end

 --reset things to normal
 poke(0x5f54,0)
 pal()

end

--helper wrapper for sspr that allows us to conveniently change a line function into an sspr function
function ssprline(x1,y1,x2,y2)
 sspr(x1,y1,1,y2-y1,x1,y1)
end |
And here is the cart for you to download
True Clipping Mask with Method 3
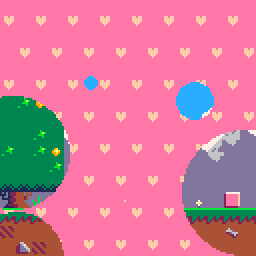
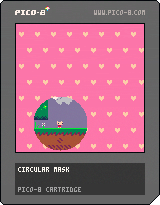
So far, our clipping masks haven't been "real" clipping masks. We just filled the outside with a solid black. A true clipping mask like the one you'll get with the CLIP() function should also allow you to combine two unrelated images. The previous step already paved the way to make this happen.
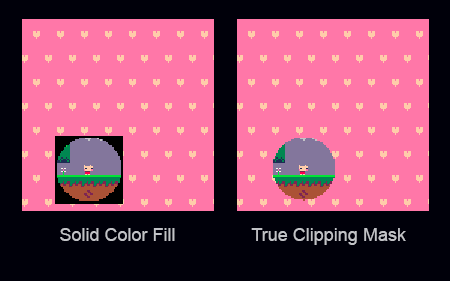
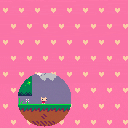
Finally it's time to set our DRAWMYBG variable from the Workbench to TRUE so the program will draw a cute heart background before drawing the Jelpi game. Our goal is now to combine the two images using a circular mask.
Here is how that will work.
- Draw the cute heart background
- Take the contents of the screen (the heart background) and save them into RAM. We will use the new extended RAM functionality of 0.2.4 for that. Essentially, we will take a screenshot.
- Draw the Jelpi game as normal
- Copy the screenshot we made earlier into the spritesheet
- Use the line-drawing function as before to draw the entire screen line by line leaving out a circular spot. But now we will actually use the spritesheet as the source, which now contains the heart background.
- Reset the spritesheet to what it was before
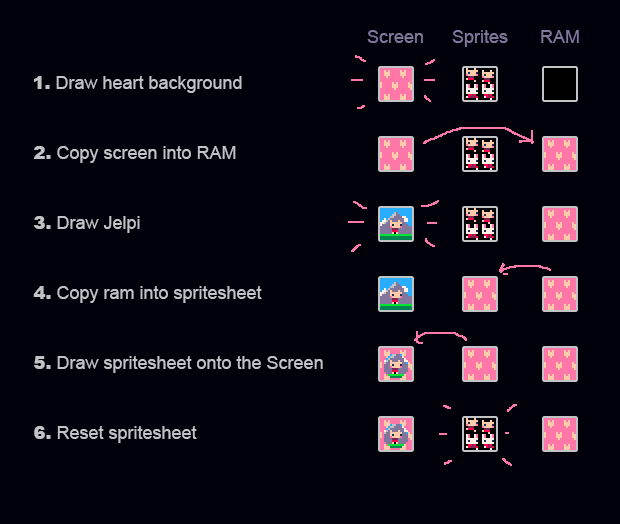
This is what the effect looks like (first step 5 in "slow-mo" and then everything in real-time):
The code for this is actually deceptively similar than the previous one so instead of posting the entire AFTERDRAW() function again, I will just focus on important lines. You can look at the final code in the cart posted below.
--this will copy the screen contents to a spot in the new expanded RAM section --essentially, this makes a screenshot memcpy(0x8000,0x6000,0x2000) --this will copy the screenshot into the spritesheet memcpy(0,0x8000,0x2000) --this resets the spritesheet to it's original state reload(0,0,0x2000) |
And here is the cart for you to download
Pros
- Can be the quickest method
- Uses no sprites
- Super versatile
Cons
- Math overload can cause nosebleed
- Circle with a small radius looks square-ish
Method 4: Video Remapping Stencil
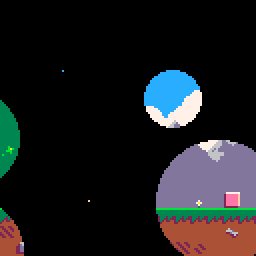
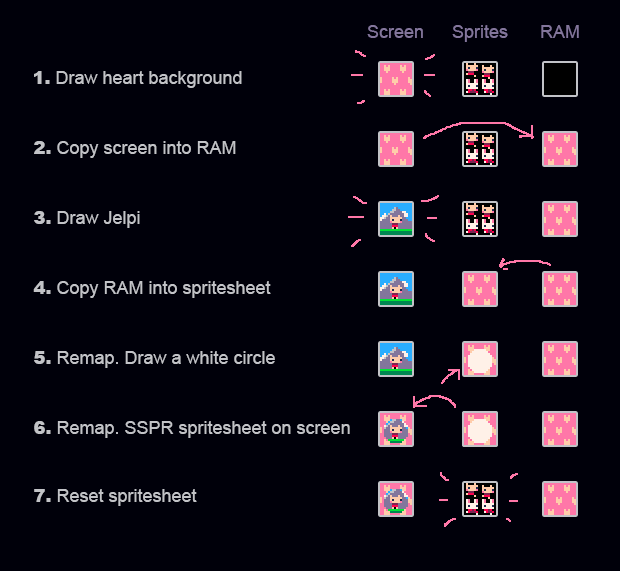
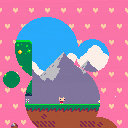
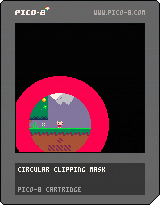
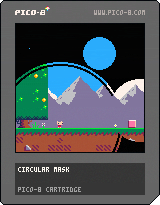
Method 3 was complicated. Method 4 sure SOUNDS complicated but as you will see the code is fairly simple and compact. Method 4 is all about exploiting 0.2.4 functionality to Video Remap and copy around screen contents to make Pico-8 do the heavy lifting for us. Ultimately what we're aiming to achieve is to use the regular CIRCFILL() function to draw a solid circle and "punch out" that circle by setting the circle's color to transparent while drawing it to the screen.
Let's begin with the simple black background version of it. Here is the plan:
- Draw the Jelpi game screen
- Remap the spritesheet to become the screen. Paint the spritesheet all black.
- Draw a white circle on the spritesheet
- Reset video remapping to normal. Set white to transparent. Draw the entire spritesheet onto the screen.
- Reset the spritesheet to how it was before

This sounds complicated but this is what the entire AFTERDRAW() function looks like:
function afterdraw() --remap spritesheet to become the screen poke(0x5f55,0) --fill the spritesheet with black palt(0,false) cls(0) --draw a white circle on the spritesheet circfill(myx,myy,myr,7) --video remapping back to normal poke(0x5f55,0x60) --set white to transparent palt(7,true) --draw the entire spritesheet to the screen sspr(0,0,128,128,0,0) --reset everything reload(0,0,0x2000) palt() end |
And it looks like this. Just a nice and clean Circular Clipping Mask.

Now this method has one disadvantage in that it takes a lot of processing power. We are copying and drawing large amounts of data for Pico-8 standards. So this may look like a mediocre trade. However, one huge advantage of this method is that we can have as many overlapping circular masks as we want at no additional cost. We achieve this my simply drawing a few more circles onto the spritesheet. Things can get pretty wild.
The advantages here should be obvious. This can be a useful technique if we have a game where we need more than just one circular mask at any given time. For example: a dark level illuminated by multiple light sources.
Here is the cart for you to download:
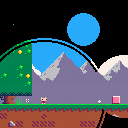
Fake Alpha with Method 4
We can use similar techniques to the ones discussed in Method 3 to achieve the Fake Alpha effect with Method 4. Here is the plan:
- Draw the Jelpi game to the screen
- Copy Screen contents to the spritesheet
- Remap the spritesheet to become the screen. Draw a white circle on the spritesheet
- Reset video remapping to normal. Set white to transparent. Shift the palette for the colors to become darker. Draw the entire spritesheet onto the screen
- Reset the spritesheet to how it was before
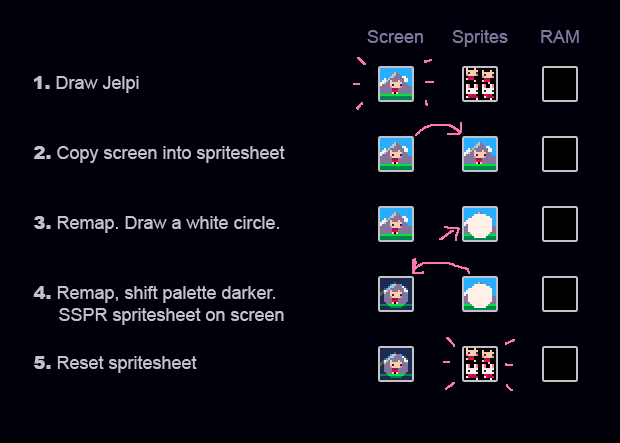
This is essentially the same procedure as the basic Method 4 except instead of filling the spritesheet with black we fill it with the contents of the screen. We also shift the palette darker when we draw the spritesheet back onto the screen. The advantages of Method 4 persist. We can still use multiple intersecting circular masks.
Besides the already mentioned cases this could be potentially used for all sorts of decorative effects such as this canopy shadow effect in A Link to the Past.
Here is the cart for you to download:
True Clipping Mask with Method 4
And finally here is how to achieve a true Clipping Mask with Method 4. Which means we once again set DRAWMYBG to TRUE so the program renders the heart background before it renders the game. Our goal is to combine the two using the circular mask. Here is the plan:
- Draw the hart background to the screen
- Save a screenshot of the hart background to RAM
- Draw the Jelpi game to the screen
- Copy heart background screenshot from RAM to the spritesheet
- Remap the spritesheet to become the screen. Draw a white circle on the spritesheet
- Reset video remapping to normal. Set white to transparent. Draw the entire spritesheet onto the screen
- Reset the spritesheet to how it was before
If you've been following this post none of the methods should be new to you at this point. This is what the result looks like.
And here is the cart for you to download and look at the code
Pros
- Fairly short
- Uses no sprites
- Circles look clean at any size
- Allows multiple intersecting masks
- Versatile
Cons
- CPU intensive
- Tapping into weird tech
Performance
Here is the 30FPS CPU load I got on the above carts.
Just Jelpi : 18% Method 1 : 7% - 25% Method 2 : 7% - 29% Method 3 : 7% - 20% Method 3 Alpha : 34% - 28% Method 3 True : 62% - 67% Method 4 : 53% Method 4 Alpha : 56% Method 4 True : 64% |
Method 3 appears to be the most efficient one. Method 4 is flexible and simple but the high CPU load means it's prohibitive to use in 60FPS unless it can be effectively optimized for it's use case. Generally, using the Fake Alpha and True Clipping Mask trick is heavy on the CPU and needs to be used with caution.
Sources
None of the methods I've described here are my own ideas. So at this point I wanted to give big thanks to all the people that I've learned those techniques from. The people I'm listing here aren't necessarily the original creators. They are just the people I've learned them from myself.
A good example for this is Method 1. I'm sure others had a similar idea before. But I've first seen it in use by one of my own students! @xCoraNil used this effectively in their game Night of the Worm Slayer.
Method 2 is something I've recently seen in a Twitter post by @sticky.
Method 3 I've first seen in in this excellent post on this subject. It was @freds72 who suggested doing it like this and I was pretty surprised about how simple the core math formula was.
Method 4 is something @NMcCoy suggested in a Twitter conversation not long ago.
It's Your Turn!
This was a long post. Now it's your turn!
- Try the different methods out. Post Results!
- None of the code is optimized for speed or for tokens yet. I'd love some help with that!
- Do you have ideas for your own methods? Post them here as well!
Let's build a repository of tools to tackle this recurring problem!
|
366
|
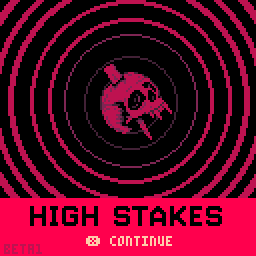

Las Vegas 2024. Vampires have stolen your blood. Play the card game of your life and win it all back.
Rules
Every round you will be dealt 9 cards face-down. The goal of the game is to flip as many cards face-up as possible. There is one Vampire card and 8 value cards ranging from 2 to 9. There is always only one copy in each card on the board. If you flip the Vampire card you lose the round.
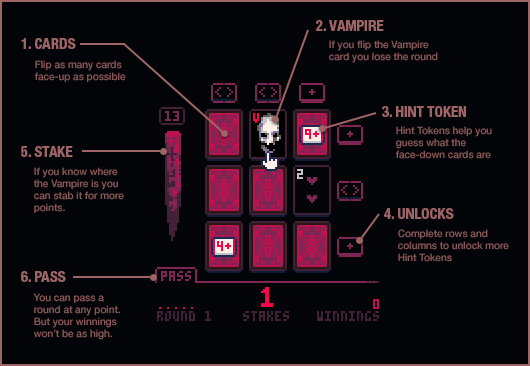
Complete rows or columns to unlock Hint Tokens.
-
A [+] hint token can be placed on a face-down card to predict its number. The token will display a number once placed. The value of the face-down card is that number or higher. Vampire cards count as 10. So a [8+] token means the card is either a 9, an 8 or a Vampire
-
A [<>] token can be placed on a face-up card to predict the numbers of adjacent face-down cards. The token will show which adjecent cards have a higher or lower value. Vampire cards count as 10.
- A [□] hint token will highlight a 2x2 area. The Vampire card must be in that area.
If you think you know where the Vampire card is you can use the Stake to stab it immediately for more points.
Flipping a card will raise the stakes. If you flip over all value cards or stab the Vampire the stakes will be added to your winnings. If you flip the Vampire the stakes will be substracted from your winnings.
You can use the button in the lower left corner to pass a round. You will keep the stakes but you need to pay a penalty of the value of two card flips.
Each match lasts 5 rounds.
Use the blood you win to unlock opponents with higher payouts. You win the game if your reach 5000ml. Your progress will be saved between matches. But if you lose all your blood your savegame will be wiped and you need to start over.
Credits
This game was created as part of the A Game By Its Cover Jam 2020. The goal was to create a game based on of the cartridge covers from the Famicase Exhibition 2020. The cover to High Stakes was created by Tyler Q Anderson and Jamie C Lee.
The music was composed by Gruber Music.
The game was written and designed by me ;). Enjoy!
MEMSPLORE
I made this little tool to visualize and edit PICO-8's memory. The app has 3 modes
(From Right to Left)
- LIST MODE - Shows addresses in a list. Parses the content of the memory as decimal, hexadecimal and binary numbers. Also renders the value as a character.
- HEX MODE - Shows addresses as hexadecimal numbers with 6 entries in each row. Also renders the values as a line of pixels.
- DOT MODE - Shows addresses as sequence of dots with 8 entries in each row. Unlike the other two modes this doesn't allow you to edit the numbers and is only for visualization purposes.
In addition each mode has two tools to find a specific address:
- MAP - Shows a simplified map of the memory. It's a pattern of boxes. Each box represents 32 bytes. Clicking on a box will jump to that address. The shortcut is M.
- JUMP - Allows you to enter a hexadecimal address directly. The shortcut is J.
Let me know if there are some errors. Let me also know if there are any features that you'd really love to have.
(Tilemap contains a partial artwork originally by @johanvinet)
Change Log:
0.0.1 - Initial Release
0.0.2 - Added description to button mapping (0x5F4C - 0x5F53). Tweaked description to 0x5F33 and 0x5F34.
0.0.3 - Added new addresses for the 0.2.2 release - Custom Font and Print Attributes. Fixed a bug where random beeps would be heard in list mode. Splash screen now only shows up once a day.
0.0.4 - Updated for 0.2.4
0.2.5e - Changed Version numbering to match the Pico-8 version
Not a bug but a feature request since Zep is still adding features on 0.2.0j. It would be great if the drawing tool would show a preview of the pixel you are about to draw as the cursor moves into the canvas. Here is a gif of what I mean:
This is the default setting in programs like Aseprite. It helps judging the scale and placement of pixels especially when the canvas is blank. I'm so used to it from Aseprite and I really miss this when I jump into Pico-8 to touch up things.
Not necessarily a bug - just unexpected behavior / missing functionality in 0.2.0i.
When in the new SFX / Music Organiser and switching to SFX view it is possible to copy and paste SFX around within the loaded cart cart. However, when you copy an SFX in this mode you can't paste it into another cart. Instead it will paste the pattern.
It an odd case. It technically makes sense because this is still the Pattern view. But subjectively, by switching into the Organiser and to SFX it becomes a very SFX-focused interface. So I would expect to be able to copy SFX from here and paste them to other carts.
This is especially the case since this view lends itself very well to a typical use scenario I encounter often. Let's say I have an old game that I want to re-use some sound effects from. I would fire up the SFX Organiser, shift-select the SFX I want and copy and paste them to a new project.
While we're at it, I also have a feature request - it would be great if there was a visual indicator in this view to distinguish SFX that are used in patterns and SFX that aren't used in any pattern. This would help quickly identify whether an SFX is music or a sound effect. Perhaps a border or a different-colored background?
The changelog to v0.2.0e says
Added: cpu working animation when cpu usage > 120 skipped frames |
I made a program to test this behavior. Can't make the animation show up no matter how how high the CPU value gets. Confirmed by independent tester using their own code. Are we doing something wrong or is this a bug? We used v0.2.0i.
function _init() y=1 g=0 end function _draw() cls() print(time(),8,8) print(g,8,16) print(y,8,24) end function _update() for i=0,32000 do for o=0,y do g=sin(rnd()) end end y+=1 end |
This is a game exported to HTML5 with 0.2.0i. I opened it in an iPhone 6S using Safari. It's using iOS 13.4.1.
The game seems to run fine. But the buttons are unresponsive. The menu button is rendered on top of the game. After wild tapping I was able to trigger an X button press. But I can't reproduce this reliably.
The HTML + JS files were uploaded directly to my web server here:
http://www.ceeu.de/picotest
I experienced the same problem when uploading the files to itch.io.
While we are here. I have a different problem when running on an older iPad Mini:
.gif)
A tiny icon of the game in the middle of the screen. Doesn't react to taps at all. Can't launch game.
This one uses iOS 9.3.5. A bit old so I didn't expect much anyway.
One of the new features on 0.2.0 is moving sprites in the spritemap. This can be done in the map view with ctrl-x and ctrl-v. The map will be updated accordingly.
However, this won't undo properly. The map will revert but not the spritemap. See gif:
Tested in 0.2.0i

Porklike
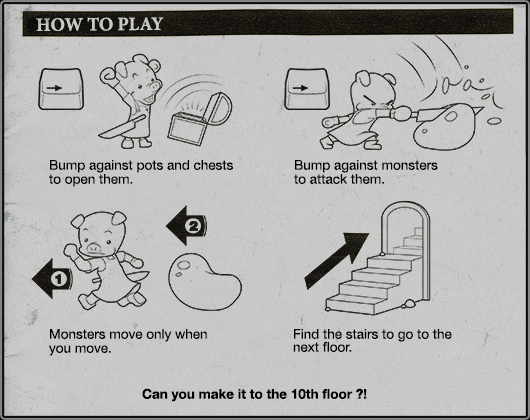
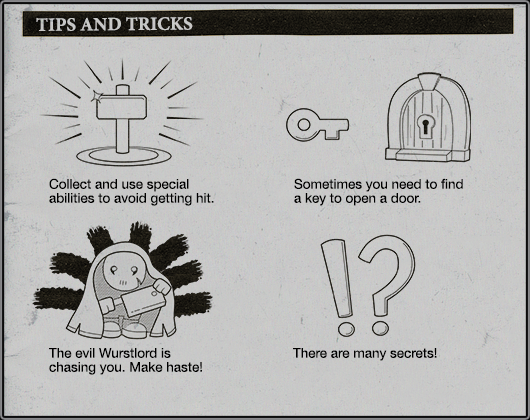
Porklike is a minimalistic, classic Roguelike made in the Pico-8 enigne. Enter the tower of Wurstlord. Can you make it to the top and steal his legendary Kielbasa? 9 floors of dangerous traps and enemies await you. Only if you move carefully and master your character's abilities will you become the champion of Porklike.
(X) - Inventory / Confirm
(O) - Cancel
The music was composed by Sebastian Haßler. The environment art as well as the protagonist was inspired by the work of the pixel artist @pixelartm and used with their permission. The artwork of the enemies was inspired by the work of the pixel artist @kirai_s and used with their permission as well.
Porklike was created as part of a video tutorial series. If you want to make your own Roguelike, please check it out:
View Older Posts